Drywall interior wall: 6 construction lessons

Our topic today is the drywall interior wall. We will figure out how to build a frame for a plasterboard partition, how to sheathe it, how to install window and door blocks in the frame, how to make an arch arch and how to ensure maximum sound insulation of the wall. Let's get started.
The content of the article
Lesson 1: Wireframe
How to install a drywall interior wall with sufficient strength and acceptable sound insulation? Obviously, you need to start with mounting the frame (see Do-it-yourself installation of a frame for drywall on a wall) For its construction, the author strongly recommends using not a bar, but a galvanized profile for the installation of gypsum plaster.
There are several reasons:
- Profiles have perfect geometry, but bars often can not boast of it;
- Wood warps when moisture fluctuates. Galvanized steel transfers them without deformation;

- A tree suffers from rot and insects, unlike its competitor. Antiseptic impregnation partly solves the problem, but partly - with stably high humidity (typical, for example, for the operating conditions of the bathroom wall), wood can still rot.
For the construction of the frame, we need profiles of two types:
| Picture | Description |
 Rack profile CW | Rack profile CW with a width of 50 mm and a thickness of 50-100 mm. The thickness is selected depending on the requirements for the rigidity of the partition and on whether it is necessary to lay any communications of a large cross section in its frame (sewers, air ducts of the ventilation system, etc.). The length of the profile should be equal to or greater than the height of the ceiling, and the number of racks is selected for a step between them of 60 centimeters. |
 UW profile 75 mm | The UW guide profile is responsible for attaching the frame to adjacent structures. Its thickness corresponds to the thickness of the racks, with a fixed height of the side walls of 40 mm. The total length of all guide profiles should be at least equal to the perimeter of the future wall. |
In addition to profiles, the number of purchases will include:
- Damper tape with a width corresponding to the width of the guides. Its task is to reduce the number of acoustic vibrations transmitted to capital structures from the partition frame;

Tip: instead of a damping tape, you can use stripped rolled foam polyethylene, which is used as a heater and substrate for a laminate and parquet.
- Tapping screws for connecting rails with racks. Length - 9 mm;
- Dowel screws for mounting rails.

Attention! In a wooden house, the guides are fastened with ordinary screws with a length of at least 40 mm.
Mounting the frame is carried out in the following order:
- We mark the partition line on the floor, then with the help of a plumb line and a long ruler or profile we transfer the markings to the ceiling and walls;
- We fasten the guides along the marking, placing a damper tape under the profile. The fastener step is no more than half a meter. For cutting a profile, use only scissors for metal: abrasive cutting with a grinder is contraindicated in thin galvanized metal, since its heating leads to burnout of zinc and the appearance of rust in the future;
- Mark the positions of the racks. The step is exactly 60 cm along the axes of the rack profiles. In this case, the seams between adjacent sheets of cladding will be in the middle of the racks;

Recall: the standard width of the sheet of drywall is 120 cm.
- We cut in height and arrange the racks. We fasten each of them to the guide screws for metal on both sides. The frame is ready.

Tip: if the height of the wall is greater than the length of the sheet, it is advisable to install jumpers between the posts from the same CW profile at the level of the seam between the main and additional sheet. They exclude the appearance of cracks under deforming loads.
Lesson 2: Sheathing
For cladding of the partition, a wall GKL with a thickness of 12.5 mm is used. The thinner ceiling plasterboard does not have sufficient strength, and may not survive an accidental elbow or portable furniture. Moreover, in rooms with high traffic (hallways, kitchens, corridors), sheathing of the frame in two layers on each side is practiced.
GCR can be ordinary (white) or moisture resistant (blue-green). The first is used in living rooms, and the second - in rooms with high humidity (kitchens, bathrooms and toilets).

Please note: drywall is purchased with a margin of 10-15% for cutting.
In addition to GCR, to turn the frame into a wall ready for finishing, you will need:
- Drywall screws or, in their absence, wood. They differ from each other only by the pitch of carving: it is somewhat larger for wood fasteners. Length - 25 mm (40 mm for attaching the second layer with a two-layer sheathing);
 and wood (right)")
- Reinforcement for joints - Serpyanka (sticky fiberglass mesh 5-8 cm wide);
- Plaster universal or finishing putty. Of the tested gypsum mixtures, the author most liked the Turkish ABS Saten: it does not give lumps when mixed, and lives after mixing for at least 45 minutes.
Not only that: ABS that has started to set can be diluted with water and continue to be used for another 15-20 minutes.
Let us break down the entire sequence of work on cladding and finishing the wall into several technological operations and describe each of them in detail.
GKL cutting
In straight lines, drywall is usually not sawed off, but broken on the edge of any elevation, after having previously cut along the ruler by about a quarter of the thickness. After that, it remains only to cut through the cardboard shell from the back.

If the edge is slightly uneven - it doesn’t matter:
- The protrusions are removed within a few seconds with a special rasp;
- Other defects are repaired when puttying joints.
- Curved parts have to be cut according to the markup previously made on the sheet shell. To do this, use:
- Drywall hacksaw (or, in its absence, a narrow garden hacksaw);
- Jigsaw with a wood file.
Important: the teeth of the file should look up towards the sole of the tool. Otherwise, when cutting, he will try to bounce on the surface of the sheet, which is guaranteed to affect the accuracy of the cut line.

Drywall Mount
The sheet is installed vertically so that its edges fall in the middle of the racks, and is attracted to all profiles covered by it (not excluding the guides) with self-tapping screws in increments of no more than 20 cm.
A few basic rules for installing drywall:
- The minimum distance from the fastener to the edge of the sheet is 20 mm. Try to fix the sheet closer to the edge - get a crumpled edge;
- The hat should sink a millimeter deeper than the surface of the kraft paper. It remains to be shut up;

- If the self-tapping screw broke through the drywall, then do not unscrew it - just screw another one next. You will remove the hole remaining in the wall sheathing when puttying.
Putty mixing
Gypsum mixtures are sold dry and are closed with water before use (seeHow to breed putty with self-repair) Its quantity per unit weight of the mixture is always indicated by the manufacturer on the packaging - usually it is equal to a liter of water per 1.6 kg of gypsum.
Putty mixing is performed as follows:
- Pour the right amount of water into a bucket or other wide container (no more than 3 liters, otherwise you have a chance not to have time to work out putty before setting it);

- Pour the dry mixture into the water, distributing it evenly on the surface;
- After 3-5 minutes, when the gypsum swells, mix the putty with a spatula or whisk until the consistency is uniform.

Caution: Never pour water into a dry gypsum mixture. The cost of violating this rule is insoluble lumps at the bottom, which will ruin the surface of the gypsum plaster when puttying.
Reinforcement and puttying
The seams are reinforced with a serpentine glued to both adjacent sheets, and puttyed with the first layer directly through its cells. The second layer is applied after the first has dried (at least 12 hours later) and hides the texture of the glass mesh. The pits from the fasteners are also putty at least twice: the second layer compensates for the shrinkage of the gypsum during hydration.

Seams between sheets cut in place, before filling, need to be stitched. With them, with a sharp knife, chamfers for 2/3 of the thickness of GCR are removed. Stitching helps fill the seam with putty to the full depth and the absence of cracks.

If the factory edges of PLUK (semicircular with thinning) make it possible to hide the reinforcement by applying a putty layer flush with the surface of the gypsum board, then the edges of the gypsum plasterboard sheets cut in place do not give such an opportunity. If the seams are thick, they will help to hide the puttying of the entire surface of the partition.
This is done with a wide spatula - putty is applied on it with a narrower tool, after which two maximally thin layers are applied perpendicular to each other.

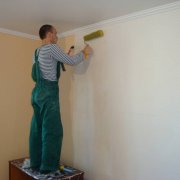
After the top coat putty has dried, the wall surface is sanded (with a grater or, which is much more convenient, a grinder), cleaned of dust and primed with a penetrating acrylic primer for wallpaper or painting (see.Drywall primer for wallpaper - why is it needed).

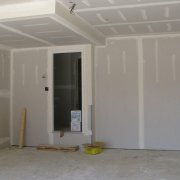
Lesson 3: doors, windows
The interior wall of drywall is often equipped with a door or (in the case of a bath or a bathroom) a light window. How to embed a window or door block into a partition? The block (box with a canvas or frame) is assembled at the assembly stage of the frame.
The procedure for installing the door is usually as follows:
- We leave a gap in the lower guide for the entire width of the door frame;

- We mount on a plumb line, strictly vertically one of the racks adjacent to the opening;
- We expose the door block to an upright position and fix it with self-tapping screws screwed from the side of the profile;
Tip: for greater reliability of mounting on the outer surface of the door frame, you can apply sealant or polyurethane foam.
- In the same way we mount the second rack on the opposite side of the block. In this case, the door leaf should be wedged in the box with wooden wedges, scraps of plywood or hardboard - otherwise in the future it may overwrite the jambs;
- We fix a jumper from the rack or guide profile above the door block.

The light window is mounted in the same way, but with two amendments:
- The gap in the lower guide for obvious reasons is not needed;
- There should be two jumpers between the racks adjacent to the opening - above the window and under it.
Lesson 4: maximum stiffness with minimum thickness
How to make a wall made of gypsum board as rigid as possible with its minimum thickness? In this case, rails and racks 50 mm thick are used for mounting the frame.
Rigidity is provided in one of three ways or their combination:
- Racks are connected in pairs (nested into each other or simply installed side by side);

- The pitch between the racks is reduced to 400 or even 300 mm. Do not forget: the width of the drywall sheet should be a multiple of this step;
- Wooden mortgages (50 mm bars) are placed in the racks.
Lesson 5: Arches
How to embed drywall arches in the walls? The only difference between the frame of such a partition and the one described above is that the arch arch must be mounted with a flexible profile.
In this quality you can use:
- Special arched profile;

- Guide profile with notched side walls every 5-10 cm (depending on the radius of the drywall arch on the wall).

Vault sheathing can be performed:
- Arch GKL 6 mm thick. It bends with a sufficiently small radius without damaging the shell and core;

- Drywall wall, notched from the back to half the depth.
- When fastened with screws to the frame, the arch forms a segmented surface.
A rounded shape is attached to the arch of the arch on the wall of drywall when puttying.

Lesson 6: Soundproofing
For obvious reasons, the wall between the bedroom and the living room should provide maximum sound insulation - a member of your family who hardly wants to get enough sleep will enjoy the sounds of a feast or watching another blockbuster on a night television channel.
The simplest way to soundproof a drywall wall is to fill the cavities of the carcass with mineral wool. For this purpose, it is best to purchase glued boards with a size of 1000x600 mm. Their dimensions allow you to install a heater between the racks with a standard pitch unaware, without cutting them in width.
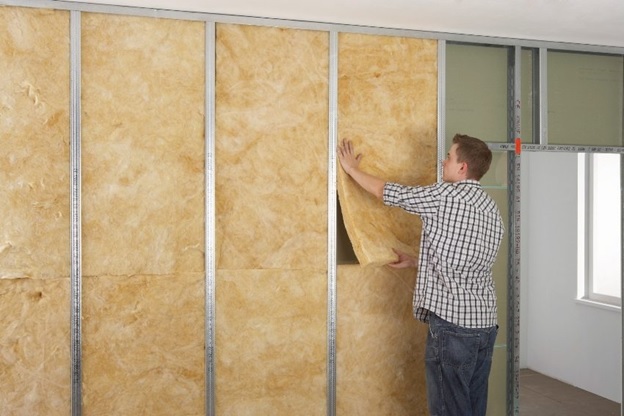
However, mineral wool will only absorb acoustic resonance in the cavity of the frame. Meanwhile, the frame itself is also able to transmit acoustic vibrations from one side of the wall to the other.
The problem is solved by the construction of two independent frames with a thickness of 50 to 100 mm each with a small gap between them. The cavities between the racks are filled with mineral wool; sheathing on each side is carried out in one or, which is much more reasonable, in two layers.

Conclusion
We hope that our lessons will help the reader to master the basics of construction from the GKL. To learn more about how to build do-it-yourself interior walls from drywall, the video in this article will help you. Good luck!