Do-it-yourself brick wall imitation in different versions

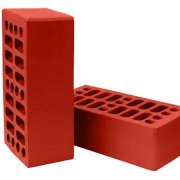
How to make an imitation of a brick wall, many think. After all, making a brick wall does not always work. To do this, you need a solid and wide foundation or high-quality load-bearing walls. After all, a brick weighs a lot. But today there are many options to make an imitation of brickwork and at the same time do not greatly increase the weight of the structure.
Today we will tell you what imitation of a brick wall is done and you can choose the most optimal option. You can also see visual examples in the video in this article and photo and choose the most suitable design.
The content of the article
Brick wall
If the room has a brick wall, then it is enough to remove the top layer of decoration, slightly modify and the brickwork is ready. At the same time - it will be really a “real” wall built by builders. It remains to simply paint and varnish it (seeHow to paint a brick wall: two options for perfect repair).
- It is enough to clean the surface from the finish, take the grinder and emery disc and grind it. The seams between the bricks are covered with a special mixture, this will help remove visible bumps and defects.
- At the end of the finishing work, you can cover the surface with wax or special varnish, these materials are great for finishing a natural wall. If you do not want a shiny surface, just grab a fine-grained emery and grind it to a matte finish.
Do not forget that when removing the finish you can rarely find the perfect brickwork. But there is a way out - imitation under a natural brick. This is a great option that does not require grinding and additional finishing.
What is imitation brick finish
How to imitate a brick wall in an apartment or on a facade? Is it possible to do the imitation of masonry yourself?
Let's look at several options that are easy to implement at home, because they will not require special skills and special tools, everyone can make an imitation with their own hands. Then the final price will not be high
Surface finishing with decorative plaster
Using decorative plaster gives a quick result, and applying it is not difficult. The main advantage can be considered that you do not need to carry out painstaking work to smooth the surface, everything will be hidden under a layer of plaster.

You will have to get the following tools:
- Primer;
- Roller or wide brush;
- Decorative plaster;
- Wide spatula;
- Paint;
- A few rags;
- A small pen or ordinary stick.
With the help of jointing in natural masonry, seams are created, we don’t need this device, just a handle, a stack or a hash (a sushi stick) for plastering, in general, any long object that makes it easy to make an even and shallow seam.
So:
- The simulation should start with the preparation of the plane: be sure to remove the previous finish, cover all the holes, clean the wall of dust and ground. The decorative mixture is prepared after the soil layer has dried: on the packaging, the manufacturer indicates the necessary proportions, collect the required amount of water, fill the powder and add dye.The latter is not necessary if you just want to paint the wall after applying the plaster.
- It is not necessary to mix the whole pack at once, it is enough to divide the composition into certain portions in order to gradually process each meter of the wall before the applied mass hardens. The ideal solution does not slip from the wall, there should be no clots. Having achieved a good consistency, we get to work. Using a trowel and putty knife (seeConstruction spatula - types and differences), the decorative mixture is applied onto the plane, the excess solution is leveled and removed from the wall. No need to try to achieve smoothness, because the brick itself with roughness and small chips.
- Then we proceed to the most important stage - we make the appearance of brickwork. Naturally, their size can be arbitrary, but it’s better that they do not differ too much from ordinary ones, then the wall will look more realistic. If you are not confident in yourself, feel free to take a ruler, it will help in creating a geometrically verified pattern.
- Lines are drawn on a still uncured mass with a dry stick, thus, a masonry pattern appears, the excess solution that is released due to the lines can be easily removed with a rag. Next, proceed to the new site and so on until the entire surface is processed. Let the hardened part harden, as further exposure will affect the pattern.
- It is easy to clean the dried-up mixture with sandpaper, so you will not only remove excess material, but also correct the seams, in the end be sure to erase the dust. If you want to paint the resulting wall, then do not forget to primer, so the paint will last longer. To give the wall maximum similarity, you can choose different shades.
- There is another way: first the wall is covered with a layer of gray plaster and only then it is leveled and smoothed. Dye is added to the solution, the resulting mixture is evenly applied to the wall and seams are drawn on it. Thanks to the addition of dye, colored plaster remains in the resulting lines, it needs to be cleaned and as a result you will get an imitation of a natural brick wall.
Imitate masonry with foam
Also easily decorative brick can be made independently from polystyrene foam or expanded polystyrene.

But before you begin, you need to acquire the following tools:
- Large sheets of polystyrene;
- Marker;
- Long ruler;
- Stationery knife;
- Tile adhesive
- A few cans of paint (seeStyrofoam paint: which can be used).
During preparation, it is worth marking the foam sheets: using a long ruler and marker, draw standard 7x15 cm bricks, do not forget to make an allowance for the seam.
- Then with a clerical knife we cut the marked foam and prepare the plane.
- We remove the finishing layer, cover the holes and scratches, be sure to smooth the wall and do not forget about the soil layer. Glue is smeared on the prepared wall, then the bricks are gradually glued; Do not forget about the gaps, between each brick it is enough to leave 2 mm. After all the elements are fixed, proceed to painting the wall, be sure to fill the seams with paint and do not forget to remove streaks.
- To achieve maximum similarity, you can apply chaotic chips and scratches on the foam in advance, the painted wall will look a bit worn, but so similar to the original masonry. It is quite simple to achieve a unique texture with the help of a tin strip cut out of canned food. It is also worth painting part of the bricks with another paint. We select the most similar shades and go.
Textured Wallpaper
There are special wallpapers that imitate natural masonry.If a couple of years ago, these were ordinary wallpapers, now modern technologies allow you to get real textured wallpapers, of course, they can not be distinguished from brickwork from afar, but it is noticeable nearby that this is an imitation.

Textured wallpapers have several advantages:
- Low cost in comparison with the methods described above;
- High installation speed;
- Easy to clean - Wallpaper can be washed, and dust does not accumulate on the surface.
Attention: If you decided to stick the wallpaper, then now special options for applying foamed polymer to paper have appeared on the market - such wallpapers are very realistic.
Ready-made simulation panel
These words mean the finished plastic version, where the surface is identical to natural masonry.

- It is enough to buy a panel and ordinary wallpaper glue to remake your wall in a few hours. At the same time, they are equally well used in outdoor decoration. In order for the glued panel to hold well, you need to prepare the wall in advance, do not forget about the primer.
- If the wall is not even then you are leveling the plane. This can be done with plaster. If this is the inner surface, then this can also be done with drywall.
- The second option is also beneficial in that you can immediately make wall insulation.
For the crate, you have to make a choice of two materials. It is metal and wood.
 Wooden crate Installation of a wooden crate | Wood is best used for finishing internal surfaces. It is quite simply processed and you can easily make transitions even to several levels. |
 Metal crate Installation of a wooden crate | In the first case, the metal will be most optimal for outdoor decoration. A coating is made on the metal that prevents the occurrence of rust.
|
Screen embossing
The process takes place on a freshly plastered surface. A ready-made stencil is taken (usually from rubber or polymers) with a masonry relief applied. Here we will look at how to draw an imitation of a brick on a wall.

- The working side must be doused with water, you can simply spray from the spray gun. Then it is necessary to gently but firmly press the structure to the plane.
- Hold it for a few seconds, then carefully remove it, ideally there will be contours of the seams on the wall.
After processing part of the wall, repeat the same operation again. It is extremely important to move the stencil to a new part of the wall, taking into account the already made lines of imitation masonry, otherwise it will make a whistle.
- The hardened layer of plaster needs to be additionally primed or covered with wax. After the surface dries, proceed to painting. Of course, you can do without this, then you should add a few color additives to the plaster in advance. If you did so, then you need to apply plaster in several layers and do not forget to smooth it. The result will be very similar to the color of real bricks. Do not forget about the additional coloring of the seams.
When choosing a paint, do not forget that having dried it will become darker!
Figured masonry
This option is notable for the installation method. In fact, you take ready-made ceramics and just glue it on a previously prepared wall. The process is completely similar to ordinary tile facing, except that it is thicker and leaves a wide opening during installation.

- The gap between the tiles must be covered with any glue mixture. Once the seam is completely dry, it must be primed or varnished. Due to this, during the painting process, it will retain its color.
- It is not necessary to buy a finished tile, if you have a lot of unnecessary bricks and a grinder, if you want, it is easy to cut the tile yourself.
- In principle, it is possible to make tiles from wood, drywall, tile adhesive, corrugated board, we will describe in more detail below.
Painted tile
The process is somewhat reminiscent of applying a print using a stencil, here we will also need fresh plaster.
- We put plaster on the plane and smooth it, thus, we get a random relief, which will be something similar to the texture of bricks. As soon as the wall has dried out a bit, we get to work. You need to draw the contours of the bricks. This is most easily done under the ruler, but then it will turn out too strict, it is better to draw contours without any adaptations, it will turn out much more natural and chaotic.
- Having finished with the contour, you need to take a narrow scraper and clean the plaster, thereby highlighting the contours of the brick. The result is a small depression, it must be cleaned with a normal rag or brush. This is done in order to remove crumbling plaster before it hardens.
- Subsequent finishing is completely similar to the screen printing method described above.
Putty brick
If there is a prepared wall, feel free to choose this option. On the plane you need to apply a light coat of putty with a color additive. And then we do as in the previous method, just draw the masonry contour on a slightly frozen surface.

By the way, the relief can be done quickly and simply using construction tape.
You need to act like this:
- Having a dry plastered plane, it is necessary, armed with markers or a felt-tip pen, to mark the seams. Keep in mind that each next row should shift relative to the previous one, otherwise, you will get a prison lattice, but not a masonry.
- The outlined seam needs to be painted and wait until the paint dries.
- As soon as the paint dries, stick the adhesive tape strips along the seams, and then stick a thin strip of adhesive tape on them. This is necessary for subsequent easy removal of adhesive tape.
- Then we put a light layer of putty on top, it is not necessary to smooth it, you can leave everything as it is, then an interesting and original structure will turn out.
- As soon as the putty is seized, we begin to tear off strips of adhesive tape. Since they are glued together, it will be easy to remove the entire adhesive tape.
- Now we wait until the wall is completely dry.
- As soon as the plane dries, you can begin to finish the surface as described above.
Corrugated board imitation
Imitation with this material is the most profitable and easiest way to decorate the wall.

The following things will be needed in the work:
- Corrugated cardboard - in principle, it is not necessarily a buyer, it is enough to take all the cardboard boxes from under shoes, household appliances, etc .;
- A couple of bundles of paper napkins, always dense;
- A few cans of PVA and wide brushes;
- Glue gun, hot glue;
- A sharp narrow knife (suitable clerical);
- Pencil and a large ruler;
- Paint, varnish.
Now let's talk about the process itself:
- If there was wallpaper on the wall, be sure to primer the surface, and if the paint is cleaned and degreased.
- We cut the corrugated cardboard to the size of the side plane of the brick, it will take some time.
- We mark the wall, so it will be more convenient to glue our "bricks", but note that the rows must be displaced in order to get the masonry, and not the grate.
- Then we spread the PVA cardboard, but there is a trick, at the corners the corrugated cardboard should be dry, glue from the gun is applied there. Thanks to such a simple combination, cardboard can be quickly fixed;
- Now the most difficult stage. We take paper napkins and decorate cardboard bricks by gluing.It is not as difficult as it seems, you need to apply glue to the surface of the rectangle, and then stick a napkin there, which should be oiled with glue.
- At the stage of gluing napkins, it is important to form seams, here you will not need any special tools, you can take a pencil, or just press with your finger, so they will be slightly recessed into the wall. This is necessary to smooth the sharp edges of the "bricks", thereby achieving maximum similarity with a real wall.
- At the final stage, when the entire wall has dried, decorative painting and varnishing begins. Varnish will help protect the imitation from mechanical damage. Having dried, the decorated wall will be as similar as possible to a brick one.
Attention: Only dense wipes are used in the work, otherwise they will simply get wet from glue.
Before sticking to the surface, slightly crush them in the palm of your hand, this will create folds that will eventually repeat the random texture of the brick. It is better to choose white wipes, otherwise, it may turn out so that their natural color comes out from under the paint.
Nuances and design examples
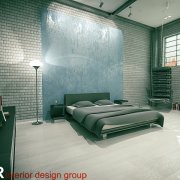
When choosing an imitation of masonry, you need to consider that this can not only bring a twist to the interior, but also completely suppress the rest of the design with its pretentiousness.
Caution: We do not recommend doing all the walls in this way. It can be used for several load-bearing walls, or even appear in some areas, favorably decorating a picture, fresco or furniture.
Before starting work, you need to fully imagine what a room with an imitation of a brick wall will look like. Thanks to the brick wall, you can make your home original and comfortable, and it’s up to you to decide which method to use, because any of the options described above perfectly imitates natural masonry.
By the way, the technologies discussed above can be used to obtain brickwork not only on the walls, many decorate vases and furniture in this way, thereby adding a few more elements to the “brick” design.
With the help of simulation you can create unique patterns. They can be quite original and decorate any room.

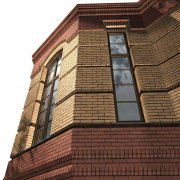
It will also be quite acceptable to look at the opening of openings, it can be windows or doors.

Also, with the help of imitation, you can find interesting solutions and moreover useful.

With this decorative decoration you can always make additions to the room. Which is not always possible to do on the walls.

A decorative brick finish can look good and be useful in simulating the working part of the kitchen. After all, if you take the panels, then it will not only protect the wall from moisture, but it will also look good.

You can also zone the room, highlighting the most attractive places in the room.

Do-it-yourself imitation of a brick wall is not complicated, but creative. With imagination, you can make just masterpieces and instructions will help you with this.