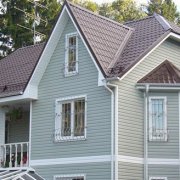
How to fix siding to a brick wall

The methods of wall cladding siding, in principle, are divided into two types, this is using lathing and fastening directly on the wall. But the first option is mainly used, and we will describe how to sheathe external walls with siding in this article.
The work is not so difficult and it will be completely possible to do it yourself, for this the instruction below will be presented.
The content of the article
Siding Installation Procedure
The technological process of wall cladding with siding is not complicated, it is important to make the purchase of high-quality material and components and after that do everything in a certain sequence. Indeed, the geometry of the installation and the durability of the structure will depend on this. Let's take a look at the points on how to properly wall the walls with siding.
Siding Tools
Before proceeding with siding, make sure that you have the following details:
- Grinder or saw with small teeth
- Scissors for cutting metal products
- Screwdriver, screw-in tool
- Hammer
- Roulette (preferably laser, which will greatly facilitate the work), square, level
- Portable ladder, its level should be sufficient to easily reach the roof
Siding developers have created a whole set of elements and panels that will be useful for cladding even the most complex residential building in structure. It is enough for the client to provide a detailed description of his housing to a specialist, so that he independently calculates the required number of necessary elements for siding.
We make the right calculation
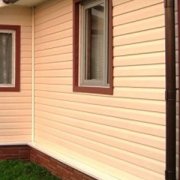
Fastening siding to a brick wall is done using various additional elements. They are available for sale and will greatly facilitate the quality of work.
Accessories for working with siding include the following components:
- The height of the outer corner should be three meters. If the room consists of one floor, then for all external corners you need to apply whole elements. If the walls are higher than three meters, then the addition of the duration of the corners is carried out, after which the resulting amount must be divided into three. It is imperative to leave space for docking. The use of external corners has not only aesthetic and decorative value. Corners are also used to close siding ends.
- Internal angles can be calculated on the basis of external ones. If the ledge of the roof will be covered with siding, then at the places of its joints with the wall, you need to use the internal corners. When finishing work with a ledge of the roof, a spotlight and a wind bar are used. If the cornice remains intact, then the use of the finish bar will be the right decision.
- Use J Profile in those areas where the layout of the roofs varies, or when several extensions are attached.
- Cover the windows with a bar, carefully place the ebbs.
- Install a drain bar at the foot of the wall. In case of lack of its width, use ebbs.
- If the house is longer than 3.66 m, use the H-profile for fastening. At the same time, try to keep the ratio of the house the same.
- If you do not know how many panels will be needed for siding, then use the special calculation formula: (meter of walls of the house - meter of windows and doors / meter of panels) * 1.10.
- When installing, it is best to use galvanized screwswhich easily leave the interval necessary for fastening. On 1 sq.m. usually have 2 screws. If there is a possibility of acquiring self-tapping screws with a rubberized washer, then be sure to buy them. They guarantee that rust will not occur in the future.
Now we will figure out how to prepare a wall for siding and for this you need to perform several operations. To get started, remove the protruding elements, such as platbands, doors, grilles and more.
If there are gaps in the room, then coat them with cement. Treat the walls if they are covered with dirt, old paint or have rotten zones.
If the house is made of wood, be sure to treat the house with antiseptic agents. In the case of covering the house with foam concrete blocks, the walls can be finished with a primer (see Primer walls and all for that matter).
Installation of the crate
Before attaching the panel to the wall, it is necessary to install a crate made of metal or wood. Here the choice is yours. But metal is considered more durable. Although sometimes it’s just more convenient to use a wooden beam.
Attention: If you chose wood as the material of the frame, then it must be treated with antiseptics before use, this will significantly extend its service life.
- First of all, external strapping is done. The profile is fastened along the contour of the wall. But if you will do warming (see How is warming the walls with foam yourself), then you need to select the desired installation height. It should be larger than the thickness of the insulation by a couple cm. After all, it should not be deformed, otherwise it will lose its properties.
- A special profile for gypsum plaster may be suitable as a profile. In the case of free fastening of a vinyl profile to a building made of wood or frame, it is allowed to fasten the bars 60 * 40 mm. Do not forget to cover the slats with anti-rot and make sure that they are dried.
- Use a tape measure and level to draw lines. The result is a closed loop. Then measure the gap in the corners from the drawn line to the exterior wall of the building. Set the smallest value and draw the outline again. In subsequent work, this line will be designed to set the starting bar. It is imperative that the line matches the level. Any deviation can lead to a curvature of the cladding panel.
- Begin to set upright guides from the corners. It is imperative that the elements are firmly attached to the wall. To achieve the desired result, you can slip wooden slices under them. The guides should be 30-40 cm apart.
- Install guides where cladding requires even more work. This applies to street lamps, entrance doors. Never combine the guides together. This can lead to various barriers to ventilation, for example, mold.
Caution: The height of the transverse guides must match the height of the contour. And the height is adjusted using gaskets.
Waterproofing protection and insulation
If the house is made of wood or aerated concrete, the installation of waterproofing is carried out on a mandatory basis. And you can insulate the house at will.

- If you finally made the decision to insulate the living room, then use a special membrane as matter, which will not allow moisture and wind to penetrate into the room.
- At the final stage of installing the layer, waterproofing is applied over it. Then a coating is created from the crate, which allows you to create intervals for ventilation.
- If you do fastening a heater, then do not deform its mats. The connection is made using plastic parachutes.
Installation process for guide elements
The work process must begin with the fastening of the drainage system.It must be placed on the upper part of the basement along the previously created office. The mechanism itself is attached without much effort.
Following the drainage is the installation of corner profiles. They are fastened with screws in the upper corner of the first clearing. All further elements must be screwed into the center of the hole.
So:
- If necessary, increase the length, and place the top profile on the bottom so that it overlaps it by several centimeters. Next, set the starting bar over the drainage device. It is necessary that its length be greater than the lower part of the corner by 5 mm.
- Attach trims or J-profiles around windows so that the outer profile is longer by a couple of centimeters of the inner. Doorways should also be framed with J-profiles. Their angles can be positioned at 45 degrees or on top of each other.
- To set H-profiles, you must use the level. The installation system is similar to mounting the remaining vertical components. It is necessary to leave a free space of 5-6 mm to the cornice and foot. This will allow you to avoid deformation of the strips, for example, their expansion. Install the finish strip under the roof or where the area ends.
Panel Installation
Now we have come to the question of how to properly fix the siding on the walls. When cladding with siding, the probability of thermal expansion of the panels should be taken into account. In particular, this applies to vinyl panels.
That is why experts advise to begin the finishing process of the building from its lower part, gradually getting to the upper part. It is necessary to constantly monitor the level of fixtures. In order to firmly fix the panels, use self-tapping screws. They need to be placed on top of each other "in the castle."

Attention: When siding in cold temperatures, joining seams are best done 1 cm more. This will prevent thermal expansion of the panels of the house.
There are some tips that are really useful to listen to before you begin attaching panels:
- It is forbidden to install the panels in close contact with each other. It is imperative that the seams remain between them. Otherwise, the temperature expansion of the panels will occur, and the surface will become a curve.
- Starting guides, which are the initial elements in the installation of panels, it is desirable to fix the level and firmly. The degree of rigidity of the fasteners determines how easy the further sheathing will be.
- It is advisable to place self-tapping screws 30 mm from the panels, otherwise their components will have deformations and, in the end, will break.
- After installing the panels, it is advisable to establish a small order: remove the joints and hide the empty areas at the openings, reinstall the casing and place the tides together with the drainage system.
After a detailed study of the siding of a house, it is safe to conclude that doing this work yourself is not at all difficult. The technique of facing is almost uniform, despite minor differences, it is quite possible to finish the walls with siding in the bathroom.
To do this, just look at the photos and videos in this article. However, if we talk exclusively about the properties of the material (about its characteristics, strength, etc.), then perform siding the house possible without much effort. The price of the material is not high and everyone can afford this type of finish.