Plaster siding: we perform wall cladding

Elements of facade cladding mounted on the crate, it is customary to call siding in our time. Although originally, the term siding was used to refer to a wooden plank cladding of exterior walls that overlaps.
Later, metal panels began to be called so (see Facing the facade with metal siding will make building protection reliable), plastic and composite materials that imitate the board in shape and texture. Over time, not only the shape of the panels has changed, but also their appearance. Today, the consumer is offered all kinds of imitations of natural structural materials: timber and logs, stone, brickwork, as well as plaster siding, which will be discussed in the video in this article.
The content of the article
Compare the stucco with the cladding
It is simply impossible to overestimate the merits of decorative plaster. The durability and aesthetics of the coating contribute to the widespread dissemination of this type of finish - especially when it comes to exterior walls.
And, frankly, there are much more opportunities for design when plastering. The only problem is the laborious technology of work, which not everyone can do with their own hands.
So:
- Actually, therefore, the question: “Which is cheaper - stucco or siding?” - so worries our readers. The fact is that with the involvement of hired specialists, the cost of plastering increases sharply. The price of decorative plastering services, as a rule, “competes” with the cost of the material used in the work.

- If, for example, one bag of pebble mixture, weighing 25 kg and priced at 1350 rubles, is enough to finish 6 m2 of the wall, then you will have to pay a minimum of 1800 rubles to finish this area - that is, even more than for the material. Good panels, of course, are also not worth a penny. But during their installation there are no wet processes, and the installation does not require such a high qualification of the performer as the plastering process.
- For independent work you need only detailed instructions, and even a set of necessary tools. This is one of the main criteria that affect the decision of a person making a choice in favor of a particular finish option. Another indisputable advantage of siding cladding is the ability to insulate the facade.
Next, let's try to figure out together which is better: plaster or siding. We offer you information, and you analyze it - and make your choice.
Stucco siding overview
So, how much do siding panels styled with plaster cost, and what options do the domestic building materials market offer the consumer today?
| The appearance of the panels | Brief information about the material and its cost |
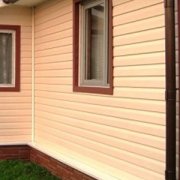
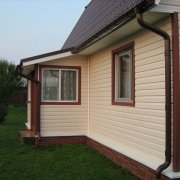
 Facade cladding: VinyTherm PVC panels | This type of panel is a product of a manufacturer of facade systems, a world-famous German company Vinylit Fassaden GmbH. VinyTherm series includes vinyl siding, and as can be seen in the photo, he imitates pebble plaster.
Panel dimensions: 0.18 * 6m, area 1.08m2. The cost depends on the type of stone used for facial decoration, but on average it is 1800 rubles. a piece.A distinctive feature of VinyTherm panels is the connection: not a lock, like most types of long siding, but tongue-and-groove.
Due to the absence of visible joints, the facade looks like plastered. Although, if desired, it is possible to highlight each element of the cladding, using panels cut in length of 1.2 m, with a chamfer at the edges. They can be combined in color, and the surface of the walls will look like tiled. |
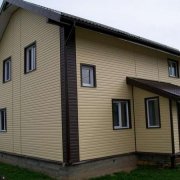
 Cement-coated cement panel | Fiber cement panels are presented here, which are popularly called ceramosiding. The undisputed leader in the production of such panels is Japan.
The products of these manufacturers are elite, have the highest quality and unlimited service life. Well-designed subsystems make such a facade also seismically stable, so it is not surprising that this type of siding is more expensive than any other.
As for the subsystem, its version is selected depending on the construction of the walls of the building. |
Since one keramosiding panel weighs about 20 kg, which creates a certain load on the walls, manufacturers give recommendations on choosing a subsystem option.
It looks like this:
- Wooden frame houses, as well as the walls of glued beams and logs: a crate of bars of 45 * 45 mm.
- Reinforced Concrete Wall Panels and masonry made of solid brick: metal frame with traditional dowel fastening.
- Walls made of lightweight and cellular concrete blocks as well as hollow brick masonry: a metal subsystem mounted on chemical anchors.

- To say that it is cheaper: siding or plaster, in this situation is quite problematic. In each case, the cost per square meter of decoration will be individual. First you need to determine the set of consumables needed for the installation of the panels, and then calculate what costs you have to incur.
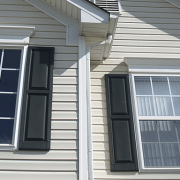
- By the way, the cost of plaster also varies greatly: there are options for 500 rubles per bag, and there are five times more expensive - a lot depends on the particular variety of decorative composition. As a budget option, you can use cement-bonded particle boards with pebble cladding, which are called sheet siding.

Their application makes it possible to get such an unusual facade, which you see in the previous example. DSPs lined with crumb are two times cheaper than VinyTherm siding with imitation of the front surface under pebble plaster.
It only weighs sheet siding three times more, sometimes breaks during installation and does not last as long as modular panels. That is, the price of the material is in full accordance with its operational qualities.
How to clad walls with siding
The main advantage of facade panels as a finishing material is the frame method of their installation. Due to the thickness of the elements of the crate, it becomes possible to create a ventilation gap - and he, in turn, prevents the formation and accumulation of condensate under the casing.
This is the best protection of the walls from the effects of precipitation and wind, which significantly extends the life of the building as a whole.
- Assembling subsystems of ventilated facades is carried out for the most part in a similar way. The difference can only occur in the distance between the elements of the crate, which is dictated by the dimensions and weight of the siding. This cannot but affect the installation process of the panels themselves.
Basically, there are various ways to attach them to the crate. In order not to get sprayed, and not to try to tell about everything at once, we will take as a basis a specific situation. We will tell you how to wall the walls with ceramic siding Nichiha on a wooden crate and without insulation.
All stages of installation
The process of facing external walls with ceramic siding consists of the following steps:
- Determination of the starting line along which the first row of panels is mounted
- Installation of base ebbs
- Installation of roll waterproofing
- Sub-assembly
- Panel hanging
- Visual adjustment of attachment points
- Sealing joints between panels
Note that we are not talking about any surface preparation, as this is not required. But let's say nevertheless that if the walls of the house have too large irregularities, they must either be leveled, or the crate must be mounted to the base base on suspensions.
Where to begin
Ceramosiding is equipped with three types of kleimers, and before installation it is necessary to make sure that they are all in place. Drawings are always attached to the panels, with the help of which it is possible to make independent wall cladding.
It is very important that the arrangement of the cladding elements on the facade is symmetrical, so you first need to think about how to do it better.

The panels can be mounted from the vertical axis of the wall, or you can combine this axis with the axis of the central panel. The location of the openings on the wall, as well as the design of the cladding, which includes inserts with different textures, also matters.
In accordance with the chosen option, it is necessary to mark the axes on the walls, draw the lower boundary of the cladding and put marks on the level at which the ebbs will be mounted.
Installation work
After the ebbs are installed, and the waterproofing of the walls is completed, you can proceed with the installation of the subfacing system. If the panels will be mounted horizontally, the elements of the crate should be mounted vertically.
In our case, wooden slats will be used for this purpose: their width should be at least 45 mm. In the corner zones and places where the cladding is adjacent to the openings and the roof, the strips should be twice as wide - 90 mm. You can install 2 * 45 mm.
So:
- If the base is a wooden wall, the crate is fixed with nails 65 mm long, at a distance of 50 cm from each other. The same distance should be between parallel racks. In places of their adjacency to the openings, gaps of 3-5 mm should be provided, providing free circulation of air under the casing.

- After the subsystem is assembled, starting strips are mounted along the lower boundary of the cladding, and in the corner zones - a connecting profile. The initial strip is mounted with an indent equal to the width of the flange of the corner element, plus a gap of 6 mm for the thermal expansion of materials. Installation of the cladding starts from the outer corner.
- The corner element is mounted on connecting strips located on both sides, and secured with clamps, fixed with nails. Since for symmetry, whole panels are mounted in the center of the wall, the cut panels are always adjacent to the corner zones and therefore are the first in a row.
- They are cut with a diamond saw with a diamond saw and, in order to avoid damage to the decorative layer of the panel, do this not from the front, but from the back. The cut-off panel is placed in the groove of the starting strip and neatly joined with the connecting profile adjacent to the corner.

- All cladding elements are fixed with clamps. As already mentioned, they come in three versions: standard (general use), for external corners and for areas where you have to make left or right connections. The kleimers have two rows of holes: the top for nails, the bottom for screws.
- Which of them you will use as fasteners depends on the option of the crate on which the panels are mounted. Each row has three holes, and the standard mount uses the middle. But in areas of panels fixed in areas of window tides or joints, extreme holes are used.
- In those areas where standard panel joints are made, double-sided dividing strips are used, which in the European version are called the H-profile. The internal seams between the cladding element and the strip are immediately filled with sealant. Then the next panel is mounted similarly. Thus, the extreme kleimers of both panels will be separated by the back of the connecting profile.

- Where the right or left joints of two panels are made, the opposite is done: the joint profile is not used, and the joints are not filled with sealant. This is necessary in order to prevent horizontal displacement of the panels during thermal expansion. That is why in such nodes use not two standard kleimers, but one left or right.
- Corner angles and one-way dividing profiles are used for internal corners. Sealing seams in these places must be performed. For bypassing window and door openings there is also a corresponding hardware. In places where the cladding is adjacent to the roof, the finish bar is used.
- The panels in the last row are usually cut. For processing slices, complete with ceramic siding there is a special quick-drying putty that is applied to the trimmed edge of the panel with a narrow brush. After all the cladding elements are installed, the visible joints are sealed. To do this, the edges of the panels are glued with masking tape, and a special primer is applied to their ends, or, as we are more used to calling, soil.
At the final stage, the joint is filled with proprietary sealant, the color of which corresponds to the shade of the front coating of the panels. Its surplus is removed by jointing, and the tape is removed by carefully wrapping it on a wooden block. On this wall cladding with ceramosiding can be considered completed.


If the structure is not styled like wood, then such a facade is perhaps the best option for decoration. Compared to plaster, installing panels is much easier, and the result is no worse.