How to putty the ceiling of drywall and avoid mistakes

It would seem that putty is a simple matter, especially if the base under it is solid and even. This is exactly what happens when installing drywall ceilings and partitions, but without knowing the technology, the sequence of work and some tricks, the result may turn out to be unsatisfactory. Therefore, we decided to talk in detail about how to putty the plasterboard ceiling correctly.
The content of the article
The ceiling is mounted, what's next?
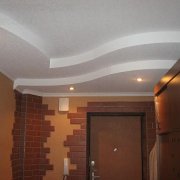
Drywall has many advantages. With its help, you can quickly level the ceiling without much dirt, make it inclined, curly, multi-level, embodying the most incredible design decisions. But for builders its main advantage is simplicity finish finish.
Drywall does not need a leveling plaster, it is enough to putty it with a thin layer, sand it - and the surface is ready for painting or another type of decoration.

But non-compliance with the technology can lead to cracks in the ceiling, peeling of putty and other troubles. How to avoid them? The instruction below will help you prevent gross errors in the work that begins with the preparatory phase.
What you need to know when starting to putty
If you want to do everything right, then keep in mind that after installation plasterboard ceiling should “hang out” for several days in order to adapt to the microclimate of the room, to take the final form. Therefore, it is not worth rushing with its putty, wait at least 7-10 days.
Tip. If you do not do the work yourself, keep track of the timing. Some masters, even knowing the need for a time interval between installation and decoration, do not comply with it, trying to hand over the object faster.
Further. Before you putty the ceiling from drywall, you need to make sure that the screws do not protrude beyond the plane of the sheets, and all the seams are embroidered.
What does it mean:
- The self-tapping hats should be recessed into the body of the drywall so as not to interfere with the putty. If they protrude, the leveling solution will take too much. Screw them with a screwdriver or a screwdriver with a cross-shaped sting.
Tip. Do not rely on your vision, go through each point of attachment with a spatula, pressing it to the ceiling. The protruding caps will prevent the tool from sliding freely.
- If the seams between the sheets are formed by the factory edges, nothing needs to be done with them yet. If these are the joints between the end or trimmed edges, they must be expanded before puttying - cut off with a paint knife at an angle of 45 degrees.
It is more convenient to do this work before assembling the sheets, but if you did not know about it, be sure to carry out this procedure at this stage. Why - write below.

The bulk of the preparatory work is completed, you can prepare the tool and materials.
What is required for work
We prepare the material and tools, taking into account the fact that the ceiling must be primed before puttying. More on why this should be done, a little later, but for now on the choice of primer and putty.
When buying materials, just read the information on the package:
- Putty is needed for any fine-grained, finishing, designed for drywall.

For reference.Many experts prefer Fugenfuller finishing putty to all other brands.
- The choice of primer is determined by the operating conditions of the room. Any acrylic is suitable, but if the room is wet, give preference to compositions with water-repellent properties and antiseptic additives that protect the base from mold.
Also, from materials you will need a serpentine tape for processing seams.
As for tools and equipment, the standard set is as follows:
- Brush and roller for applying a primer;
- Paint bath;
- A bucket for the preparation of putty (if dry mix diluted with water is used);
- Drill or perforator with mixer nozzle for mixing the solution;
- A set of spatulas of different widths;
- Sanding grater with fine-grained sandpaper;
- Ladder;
- Flashlight or spotlight to detect surface defects.
Main works
To begin with, why do we need a primer. After all, the paper surface of drywall and without it perfectly adheres to putty.
Explain:
- Firstly, the adhesion may not be good enough in those places where you cut the seams, exposing the gypsum base of the sheets;
- Secondly, in the process of installing the ceiling and performing other work in the room on the surface, in any case, dust settled, which will become a barrier between drywall and putty, worsen the adhesion of materials. And the primer will bind, glue its particles;
- Thirdly, both paper and gypsum absorb water well, literally sucking it out of solution, which leads to uneven drying of the putty and a decrease in its quality.
Therefore, it is necessary to prime (seeDrywall primer - why is it needed) And twice: at first only the seams, and after their sealing and the entire surface of the ceiling.
Sealing joints and attachment points
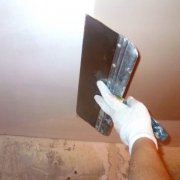
Before filling gypsum plasterboard on the ceiling for painting or wallpapering, it is necessary to fill in the solution with all the seams and close the holes with self-tapping screws on it. In places of fastenings, just walk with a narrow spatula with a small amount of putty, but with seams it is more difficult.

They should first be primed and the primer allowed to dry. Then, those seams that are formed by the factory edges are sealed with a serpentine tape.
It is done like this:
- Putty is bred in small portions to the consistency of thick sour cream. Small - because it dries pretty quickly.
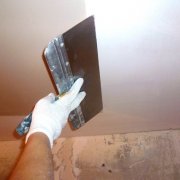
- Using a narrow spatula, the finished solution is filled in the seam so that its edges are noticeable.
- Serpyanka is cut along the seam and superimposed on fresh putty, slightly pressing into it.
- When all the seams are sealed with a serpentine, they are again puttyed, but with the help of a wider spatula, to hide the tape and align the recess of the seam with the main surface. To do this, a spatula with a small amount of the mixture on it must be held at an acute angle to the ceiling and lead it with a slight uniform pressure.

If you managed to cut the rest of the seams into a width corresponding to the width of the sickle, they are also processed. If not, then the joints are simply sealed with a solution in two stages. The second layer is applied after the final drying of the first.
For reference. If you put a sickle on such seams, it will create a thickening, which will have to be guided in the process of filling the ceiling. And this will lead to cost overruns, the price of finishing unreasonably increase.
When all the seams are dry, they, as well as the places where the self-tapping screws are sealed, are ground with a grater, removing excess putty. It is advisable to remove the dust formed after such stripping with a vacuum cleaner or a damp cloth.
Ceiling Putty
First of all, we prime the entire ceiling with a short-haired roller, using a brush in corners and inaccessible places. The primer must be allowed to dry. Drying time is indicated on the package.
After that, you can start the main work.Our ceiling is even, so the putty layer should be very thin, with a thickness of no more than 2-3 mm, or even less.
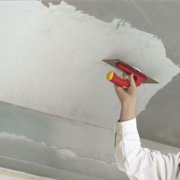
Using a mixer, prepare such an amount of solution that you can use in 30-40 minutes, and immediately proceed with puttying. To do this, draw the solution with a narrow spatula and transfer it to a wide one, evenly distributing it along the entire working length.

Holding a wide spatula at an angle of 15-20 degrees to the surface, guide them along the ceiling (seeHow to putty the ceiling - the basics of craftsmanship), making cross motions and trying not to leave stripes. Putty, which has moved closer to the handle, is collected with a narrow spatula and transferred again into place. Having completely consumed one portion, type the next and continue to work.
Puttying in this way the entire surface, give the putty time to dry, and then proceed to finishing finishing. Here you will need a spotlight or a bright flashlight. By sequentially directing its beam to the ceiling at a slight angle, carefully examine the surface.
Having noticed obvious depressions, fill them with liquid putty. The protrusions, flows and strips from the tool after drying of the corrected areas are eliminated by grinding, which is done with a fine sandpaper grater.
It is also necessary to grind under a spotlight beam in order to be able to detect the slightest irregularities and correct them.

Such a refinement is required if you decide to paint the ceiling. If it will be glued with wallpaper or ceiling tiles, minor defects can be ignored.
It remains to say that after puttying, it is desirable to prime the surface again in order to strengthen the finishing layer, make it monolithic and provide good adhesion to the finishing materials.
Conclusion
Puttying an even and smooth plasterboard ceiling is easy. But you need to do this correctly, observing the technology of work and the timing of their implementation.
It may take a long time, but you will be sure that in a couple of months wallpaper will not fall on you and paint will not sprinkle and the surface will not be covered with a web of cracks. To get more comprehensive information on this issue, we suggest that you additionally watch the video in this article.