How to putty the ceiling for painting from drywall

How to putty the ceiling for painting, we will analyze in detail today. This is, in principle, the final finish and it will completely affect the appearance after the end of work.
For high-quality performance of work, everything must be done according to technology, this will be a guarantee of quality. And if you do it yourself, then not only quality, but the price will be much lower.
There will also be instructions for the correct execution of the work and on the video in this article you can all see clearly.
The content of the article
Work Execution Rules
The biggest question will be how to putty the ceiling for painting, because it does not cover the plane with a large layer and all the flaws will be visible. Therefore, everything is important here, from preparation to coating.
Let's look at how to putty ceilings for painting in detail and do not miss anything.
Drywall preparation for putty
Preparing drywall for puttying is one of the most important and critical stages.
Attention: The final type of construction depends on how well this process is performed.
To achieve a perfectly flat wall surface, it is necessary to conduct preliminary surface preparation and eliminate minor imperfections.

So:
- It is necessary to make sure that there are no fully screwed-in screws. To do this, hold a spatula on the surface of the drywall.
- If such screws are detected, they must be screwed to the end. If everything is in order, the spatula will go smoothly, without hooks.
- In addition, it is necessary to examine the surface for the presence of deeply twisted screws (more than half the thickness of the sheet). These screws need to be unscrewed and carefully putty remaining after them indentations.
- New screws are screwed at a distance of 4-5 cm from the treated place.
At this preparatory stage before plasterboard putty completed.
Which putty is better to choose
Today in the market of building materials a large number of various mixtures intended for plasterboard puttying are presented. Moreover, you can buy not only ready-to-use putty, but also dry mixes that must be diluted with water according to the manufacturer's instructions.
So:
- When choosing a putty, the humidity level and temperature conditions in the room should be taken into account. We recommend choosing a putty having good strength characteristics. After all, the quality of the final design will depend on the processing of GKL seams.
- You also need to remember the drying speed and environmental friendliness of the mixture. When choosing a putty, you must pay attention to these parameters.
- If you have any doubts in the process of choosing putty, you need to consult with a seller who will be able to choose the optimal mixture that meets your requirements.
Drywall putty technology
Attention: Before starting work, it is recommended to set the temperature in the room that meets the recommendations of the putty manufacturer and get rid of drafts.
So:
- Before starting work, using a dry cloth, thoroughly clean the surface of dust and fine particles.
- Do not forget to process the joints of the sheets and the places where the screws are screwed in with a special primer that protects these areas from moisture and improves strength properties.
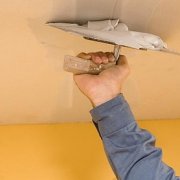
- After the primer has completely dried, a special fiberglass treated with a primer for the joints must be glued to the seams.

- Remember that the mesh is not glued to the places where the screws are screwed in, but these areas should be puttyed to level them with the general surface level.
- The next step is the re-priming of all seams and bandaging with paper tape or glass-woven bandage. Technology of work: pre-soaked paper tape is glued to the ceiling treated with glue.
To eliminate air bubbles, stretch the tape with a spatula. Cross and longitudinal seams are processed equally. - The glued bandage tape is treated with a thin layer finishing puttyto protect joints from exposure to various factors.
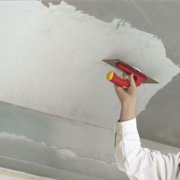
- After the finishing putty has completely dried, you can proceed to puttying the entire surface of the walls. As a rule, putty is applied in 2-3 layers. In this case, each subsequent layer is applied after the previous one has completely dried. Typically, the drying time is indicated on the packaging.

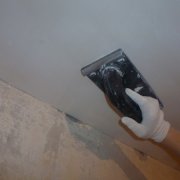
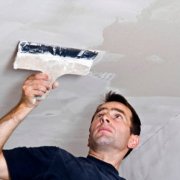
- It is convenient to use a small spatula to apply putty on drywall. The putty itself is applied in small lines or in separate sections, aligned with a common surface using a wide spatula.
- When performing work, it is recommended to turn on the side light, which allows you to see all the bumps and surface defects.
- At the final stage, the surface is treated with a fine grater. This makes it possible to eliminate scratches and residual defects of puttying.
- Then you can start other finishing work.
Putty of internal corners
To finish the inner corners, you can use special plastic perforated cornerson which a mounting grid has already been installed, designed to additionally reinforce joints and joints. But instead, you can use a special corner spatula and mounting grid.

Before filling the inside corners of the drywall, you need to make sure that the sheets are joined at the joints, since cracks and cracks appear in the corners with strong vibration of the sheets.
Putty technology is as follows:
- An assembly grid is laid at the joints, making sure that the center of the strip is located exactly in the center of the joint;
- Prepared putty is applied to the mounting grid along the entire height of the corner;
- The angle is leveled using a special angular spatula.
Attention: We recommend that you align all the planes of the inner corner one by one, without trying to align both sides at the same time. If you have some experience and special skills, you can try to simultaneously align both sides of the inner corner.
At each stage of work with the installation of metal or plastic corners, as an adhesive, you can use the starting putty, which differs from the finish by better adhesion to the wall surface and larger grit.
Plastering technology for the external corners of drywall
It is important to ensure that the design of the outer corners is done by joining two sheets. If there are no depressions at the edges of the corners forming the corner, then due to the putty, the corner will visually protrude from the wall plane.
It is not scary if during the installation of the frame and drywall, a vertically deviated angle is obtained. Alignment of such angles will require more time for their puttying.
In the process of puttying corners from drywall, a number of important nuances must be taken into account. It must be remembered that external angles must be resistant to impact and light loads.
An example of such loads can be cases when people passing through the room catch on irregularities and protrusions:
- Drywall can be strengthened using metal or plastic corners. It must be understood that drywall itself is quite poorly resistant to various mechanical stresses.
In addition, it should be borne in mind that before applying putty to the outer corners, they must be primed and only then putty. A corner is applied to the wet putty layer, which is slowly pressed into the wall. This allows you to ensure that all angles are on the same level. - As a rule, metal or plastic corners have openings through which it is convenient to remove excess putty. They are removed during the installation of the corners, using a spatula. Due to poor adhesion with putty, not removed excess putty after drying simply disappears.
- Then you can start applying the mixture. This is usually done from top to bottom, capturing each side. Care must be taken that the first layer of putty is not too thin. The thickness should be sufficient for stripping with a spatula.
- After drying and stripping, the following layers of putty are applied. In the process of cleaning the corners, you need to ensure that they are not damaged by the tip of the spatula.
- After the last layer of the finishing putty has completely dried, you can proceed to polish the surface of the walls and external corners. The primed wall surface is ready for further decorative finishes.
You now know how to putty the ceiling for painting, look at the photo and choose the exact finish option that suits your case. The main thing to remember is that not only the appearance, but also the durability of the coating will depend on the quality of the work.