Ceiling putty in different versions

How to putty the putty on the ceiling and how it is done, we will consider today in detail. The quality of the coating and appearance completely depend on this work.
Improper performance of the work can lead to peeling of the coating and it will be necessary to quickly make repairs. In the video in this article, you can visually see the entire progress of the work.
The content of the article
Do it yourself
First you need to decide how to putty the ceiling. If the coating should be more than two cm, then it is better to use a cement mortar.
The price of the material is not large, and it holds well. If you just need to apply a layer of the order of one cm, then you can use a dry mixture.
Caution: If you have a large plane, then you should take the mixture packaged in bags. It will then be cheaper from smaller volumes.
Used materials and tools
Before you start repairing the ceiling, you need to purchase all the necessary materials and prepare the tools used:
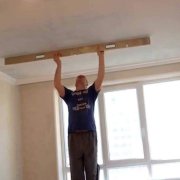
- Metal half with a length of about half a meter.
- Wide and narrow spatulas.
- Primer roller.
- A basin in which we will breed the dry mixture.
- Construction mixer, which will quickly stir the prepared mixture.
Attention: Immediately determine the type of putty. If the plane is in a room with high humidity, then it is necessary to take moisture-resistant material. When buying putty instruction should be studied. Subsequently, when preparing the putty, it is necessary to exactly follow the specified.
- Putty is made, if necessary, to smooth out small differences, followed by plastering the surface. Most dry mixes are designed to work with differences of not more than 50 millimeters.
- At the same time, we note that there are special putties that can eliminate chips and drops, the size of more than 50 millimeters.
- Also, when choosing, it is necessary to use the nature of humidity in the room to be taken into account, since putties that are different in composition are used in dry and wet rooms.
Ceiling cleaning and preparation
In the event that the ceiling plates were initially laid exactly to prepare the surface for work, it will be enough to remove the old whitewash, glue and the remains of wallpaper.

So:
- To do this, it is necessary to moisten the ceiling surface with a sponge and as soon as the whitewash is saturated with water, use a spatula to remove old finishing materials. It is better to carry out this work step by step in small sections, which will allow you to quickly complete all the necessary preparatory work.
Attention: To improve the adhesion of putty with the ceiling, it is recommended to pre-coat it with a primer mixture. This will greatly enhance the bonding of surfaces.
- The primer is applied in two layers, the first of which is applied parallel to the wall with the window, and the second perpendicular to the first layer.
- For priming you must use a roller or brush. The use of a roller is preferable, since in this case there is the possibility of the highest quality application of the primer mixture. At the same time, the primer consumption is reduced, which saves on repair work.
- In the event that there are significant differences on the ceiling before plastering it is recommended to plaster it in problem areas, which will eliminate the significant differences. Subsequent work can only be started after the plaster has completely dried.
Puttying sequence
Puttying the ceiling is done in a certain sequence. Moreover, compliance with this work performance standard is mandatory.
Preparing a working mixture Making the mixture
| To mix the dry mixture, you must use a drill with a special nozzle or a construction mixer. With the help of such tools you can prepare a homogeneous mass of putty without lumps, which impair its quality. Gently add water, which will allow you to get a mass with a consistency, like in thick fat sour cream. |
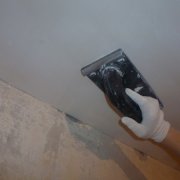
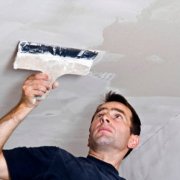
Puttying on the ceiling Apply the mixture to the ceiling | The technology for working with different types of putty is the same.
|
The required number of layers Determine the desired layer of putty | The number of putty layers directly depends on the quality of the base ceiling.
|
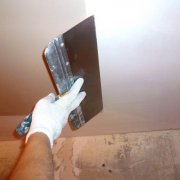
Finish layer Apply a finishing coat | The top coat is applied as thin as possible, and all work should be done as quickly as possible.
|
Final finish Making a plane grout | In the event that it is planned to wallpaper the ceiling, surface sanding is not required.
|
Features of putty ceilings for their plasterboard decoration
If Ceiling is being puttymade of drywall, leveling the surface is not required, since initially the drywall sheets have a perfectly even appearance.
So:
- In this case, the putty only gives the surface uniformity and smoothness. It is necessary to pay some attention to the joints of drywall sheets, which are aligned by applying several layers of putty. Prepare the edges of the drywall sheets using an office knife.
- The existing joints are pasted over with a fiberglass mesh, which, depending on its type, may have a self-adhesive base. In the latter case, there is no difficulty in performing repair work.
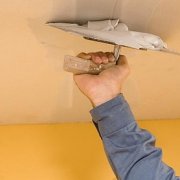
- Putty putty on the joints is necessary with a narrow spatula and immediately level the mixture with a wide spatula.As a rule, this work is not difficult and takes a minimum of time. Run it under the power of a homeowner who does not have experience repair work.
- If there are screws in the drywall sheets, they must be covered with several layers of putty, which will level the surface and protect the material from rust.
Features of putty ceilings for their subsequent painting
The ceiling can be painted with a smooth and fully leveled surface:
- When painting, you may encounter certain difficulties, namely, small pieces of putty will stick to the paint roller. To completely resolve this problem, you must:
- Use a special waterproof putty that is held firmly to the ceiling. To improve the water resistance to a conventional mixture, you can add a water-repellent primer to the putty. Remember that waterproof putty should be applied to the ceiling as quickly as possible.
- Coating the putty with one layer of waterproof primer will significantly increase the strength of the surface and eliminate the risk of delamination of the putty.
Attention: When painting the ceiling, you should act as carefully as possible and start applying the next layer of paint only after the previous one has completely hardened.
Puttying the ceiling is not as complicated as painstaking. If you do it yourself, then you will not be bothered by the question of how much it costs to putty on the ceiling. Everything can be done efficiently and in the shortest possible time.

I am preparing the bathroom myself. All walls and ceiling are sheathed with moisture-resistant drywall. I began to putty as I understand it with errors. I took the finishing putty for ordinary rooms, “HERCULES”. It was not possible the first time to achieve the desired mass. The resulting liquid then instantly hardened. I did not even have time to putty anything. He added water and still used this batch. Is it possible to fix the situation. Will the putty bounce if I now start to apply moisture-resistant putty?