How to putty the ceiling with your own hands

Ceiling putty is made during any repair. If you do not work in a quality manner, then everything will be visible right away, because this is the largest plane that immediately catches your eye. How to putty the ceiling, we will consider today.
The content of the article
Completing of the work
You can do the job yourself. Then the price will not be high. In this matter, the most important thing is to properly prepare the base plane. After all, the finish will be laid on it and all previous flaws will be repeated.
What tool is needed for puttying
You can putty the walls on your own, but this requires a certain set of tools:
| Mixer drill | Will be needed for mixing the putty mixture. In retail, putty is sold dry, packaged in bags of 30-35 kg. For readiness, a certain amount of water should be added to the dry mixture and mixed with a drill and nozzle (see How to breed putty with self-repair) It should be borne in mind that it is very difficult to mix the solution manually with quality. The finished mixture should have a creamy consistency and not have lumps. |
| Spatula | There should be several spatulas of various sizes: from wide, which allows you to quickly process large areas, to a narrow one, which could provide the master with access to an inaccessible place. |
| Set of brushes and rollers. | They will need to be treated with a primer. This is a very important stage, which ensures good adhesion of the putty to the surface to be coated. In this case, even drywall surfaces must be primed. |
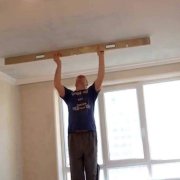
| The rule | It is needed to control the evenness of the surface. Typically, rules are provided with levels to control vertical or horizontal. If the practice is short-term, then you can do without the rule, but use a flat wooden rail and the usual building level. |
| Sandpaper | You can not do without it at the final stages of putty. Usually, the surface is ground before painting or before wallpapering to obtain a smooth surface. Especially, walls should be carefully sanded before painting. |
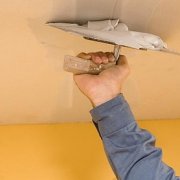
| Sander or hand grater | A grinding machine can be recommended for large putty areas. When repairing apartments, especially on their own, you can do with a hand grater. In order for the surface to be treated with high quality, good illumination should be used and the right movements should be made: first, wide irregular movements knock down serious irregularities and flows, then the surface is brought to smoothness with circular, neat movements. |
Attention: When performing puttying work, you can not do without containers in which the putty is prepared. It is very important that the containers are absolutely clean, without any debris. They must be washed thoroughly after puttying so that they can be reused.
The choice of putty
In building stores you can find plaster putty, polymer and cement.
Each putty has its own advantages and disadvantages:
| Gypsum | Plaster putties have a relatively low price compared to other types of putty, but have poor resistance to increased moisture. However, they do not shrink and are plastic in work. |
| Cement | Cement-based putties are characterized by increased strength and moisture resistance. Their disadvantage is a large degree of shrinkage, which limits their use. |
| Polymer | Polymer putties are devoid of the above disadvantages, and therefore are widely popular, as they provide high surface quality. The disadvantage is their high prices, which is not available for the general population. |
At the same time, putties are divided into universal, starting and finishing. Each of them is intended for finishing technological operations.
| Start | Starting putty is designed to align the walls. A distinctive feature of such putties is a large grain size and the possibility of applying a layer of up to 20 millimeters. Starting putties give high strength and are an excellent preparatory surface for applying finishing putty. |
| Finish line | Starting putties due to the large grain size, not perfectly smooth surface. In order to obtain a surface that can be painted without problems, it is covered finishing putty. It lacks granularity and is easy to process (polish), which makes it possible to obtain a high-quality surface. This putty is applied in a small layer (up to 4 mm). |
| Universal | These are putties that can be used both for leveling irregularities and for finishing. In structure, it is somewhat better than starting coarse-grained putties, but inferior to purely finishing materials. |
- On the construction market, you can find ready-made putty mixtures that are inferior to dry mixes, but cost much more. The fact is that dry mixes can be stored for a long time (unless, of course, stored correctly), and finished putties have their own shelf life.
- Ready putties have a large shrinkage and it is undesirable to apply them with a layer of less than 4 mm. A big plus of such putties is a good consistency, which cannot be obtained by mixing dry putties: an overdose of liquid or putty is constantly happening, which takes a lot of time before you can get the right consistency.
Surface preparation
To obtain a high-quality final result, the surface should be prepared:
Caution: Putty is applied to a clean, solid surface without layers of grease, oil, paint and soot. If there are any flaws, then they should be removed.
- Old putty is also removed (see How to remove putty from the walls and how much is needed), which, as a rule, does not hold well and can cause poor quality work.
- After removing the problem areas, a primer can be applied. Any surfaces are exposed to a primer, no matter how reliable they seem. The primer is applied with a wide brush or roller, evenly over the entire surface, without gaps.
Putting starting putty
Coarse-grained material is used as a starting putty, with the possibility of applying up to 2 centimeters of putty at a time.
Attention: Starting putty allows you to smooth out large irregularities or differences in the surface (especially the ceiling), putty strobes or holes.
- Putty can be applied in one or more layers, allowing complete drying of the previous layer.
- For greater reliability, with serious differences, it is possible to use a reinforcing mesh, which is installed during the application of the starting putty.
- The technology for applying the starting putty provides for the process of filling the entire surface and the technology of local sealing of problem areas is not allowed.
- Before applying the putty, the surface must be strong and uniform without flaws or gaps.
Putty walls on lighthouses
This technology is very often used by builders when puttying walls. The result is excellent work and quality work.

So:
- As beacons, a special perforated strip is used, which is exposed on the walls with the use of a building level, strictly vertically. For fixing, you can use building plaster or dowels with self-tapping screws. This is a very painstaking and troublesome affair that complicates the putty process and makes it very expensive.
- After installing the beacons, you can proceed with the putty process. For the installation of beacons, the process of leveling the walls is accelerated. In this case, we can safely say that the preparation process takes much longer than the putty process.
- Sometimes it is not justified, since if you compare the walls puttied along the lighthouses with the walls where the usual puttying technique was used, then the difference, without the use of special tools, can be overlooked.
Putty finishing
After complete drying of the starting putty, you can start applying the finish:
- Finishing mixtures that do not have coarse impurities are intended for this, which makes it sufficiently plastic.
- After additional processing (grinding), this surface will become perfectly flat and smooth.
- In this case, it should be remembered that the finishing putty is applied with a thin layer and is not able to level the surface.
- If the preliminary work is not performed qualitatively, then it will not work to obtain a high-quality surface after applying the finishing putty.
Sealing cracks putty
Very often cracks of various sizes can be found on surfaces. So that they do not have a negative impact in the future, they should be putty.

- To do this, you can use the same starting putty and the same primer (see Types of construction primers and their scope).
- In order for the work to be done efficiently, the crack needs to be expanded in length and width so that the putty penetrates as deep as possible into the crack.
- After this, the crack can be treated with a primer and only then can it be repaired.
The technology of applying putty on the surface
The technology of applying putty includes technology for preparing the correct consistency of putty.
The sequence is as follows:
- A certain amount of liquid is poured into a container, which is necessarily clean.
- Putty is added to the container with water in small portions, and mixed with a drill with a mixer.
- The necessary composition of the mixture is obtained by adding small portions of liquid or dry putty.
Caution: Ultimately, the resulting mixture must be ductile and held on a spatula. If it drains from the spatula, it means that it is too liquid and you need to add dry putty to the mixture. Do not mix thick putty. She will not give the opportunity to work and will quickly harden. It should also pay attention to the presence of lumps. They will indicate that the putty is not implicated in quality, or the material itself is not of high quality.
So:
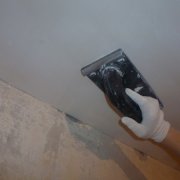
- Putty is applied to the surface with wide sweeping movements. For application to the walls, you can use a wide spatula (about 40-50 cm), and for application to the ceiling, you can use a spatula somewhat narrower. This is due to the fact that working "on the ceilings" is much harder than filling the walls. When performing puttying, it is recommended to knead small portions of putty.
- When carrying out puttying operations, various surfaces have to be puttyed, among which there are both internal and external corners. For these purposes, you can use the angular spatula. It should be noted that not all angles have an angle of 90 degrees, and an angled putty knife is not suitable for their puttying. In this case, you should rely only on the skill of the puttyer.
- The technology for applying the finishing putty is no different from the technology for applying the starting putty.In addition, the same tool can be used to carry out this technological operation. The difference is only in the thickness of the applied layers.
Attention: When performing puttying work, you should adhere to the technology and do not apply the next layer of putty without completely drying the previous one. Wall polishing is possible only after the finish layer has completely dried.
Putty walls for painting and wallpaper
Putty of walls for painting is a more responsible procedure requiring careful processing of walls at all stages of puttying. Given these features, many refuse to paint the walls, but no one has yet refused to paint the ceilings, since even white ceilings are a classic design.
Attention: To process qualitatively small areas is much easier, therefore, as a rule, ceilings are prepared for painting in areas.
Painting is carried out with white acrylic paints in two layers, at least:
- Puttying the surface under the wallpaper does not require such a thorough approach. Such surfaces are ground with a larger emery cloth. The presence on the market of modern wallpaper, with a variety of spraying or, with surfaces, of a different structure, allows you not to bother much when preparing the walls.
- Unless you glue silk-screen printing, which is able to squeeze out the smallest speck of dust. Such wallpapers require more thorough surface preparation. And on the other hand, the work must be done efficiently, regardless of what type of wallpaper will be subsequently pasted.
Attention: If thin wallpaper is selected, then polishing after putty is mandatory.