How to putty plasterboard ceiling

Puttying the ceiling of drywall - this is not an unambiguous question. It is one thing to do a rough putty, a completely different putty for painting.
In these two versions, different surface qualities are assumed. How to putty the ceiling of drywall and how to do it correctly in different versions, we will consider today.
The content of the article
Ceiling Putty
All work is done in several stages, this is surface preparation, kneading and application. All of them are important in their own way.
You can putty the walls yourself if:
- Light finishing materials, such as wallpaper or wall painting, are used. If the room does not need to remove the old plaster and plaster the room again, then, using putty, you can easily smooth the surface of the walls.
- Putty can be repeatedly applied to the smooth surface, without fear for the final result. In other words, you can practice on your walls before doing such work for others.
- At the same time, the consumption of putty material is small, which means that such a training will not be expensive.
- Putting curved surfaces is much more difficult, at first glance, but in fact, the technique of filling them is the same as the technique of filling straight surfaces.
- If you hire a putty brigade, then their work will cost much more than it would be possible to plaster the walls again.
Tools
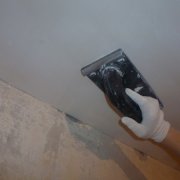
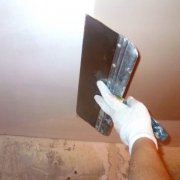
Externally, puttying tool is similar to plastering, but has serious differences. The putty putty knife should be slightly bent during the application of putty on the surface in order to obtain a thin, uniform layer, obtained due to the viscosity of the putty itself.
In order to obtain a smooth and high-quality surface, a certain angle of inclination of the tool with respect to the surface should be observed.

So:
- The spatula blade must be absolutely even and smooth, with rounded edges. The evenness of the blade can be checked upon purchase by installing it on a flat surface: if there are no gaps between the surface and the blade, then it is flat. This applies to an inexpensive tool whose blades are made using dies. The blades of more expensive spatulas are cut with a laser. In any case, this can be corrected by walking along the blade with a piece of emery cloth if the spatula blade has rough edges. As a rule, they are not significant.
- Wall polishing should be carried out using an abrasive mesh, which is installed on a grid jointer. It is not recommended to use sandpaper to polish gypsum putties, since the lumps of putty can stick to the skin and leave traces after themselves.
- Puttying, not do without a plastic bucket, preferably an economic one.
- Putty tools, including containers for kneading putty, preferably stored in a separate place. After finishing work, it must be thoroughly washed and wiped dry. It should also be wiped before starting work, so that there are no foreign objects on it, including dust, which can interfere with the quality of work.
Materials
It is necessary to decide what to putty on the ceiling. It should immediately be recalled that putties are starting and finishing, which in their composition are radically different from each other.If someone believes that this is one and the same thing, then they are very mistaken. The starting putty has a larger grain structure and with its help it will not be possible to make a smooth ceiling. In order to make it such, and is intended finishing puttyin which there are no coarse impurities.
Composition and purpose
Putty materials are divided in their composition:
| Oil and glue putty | Such varnish mixes based on drying oil are the cheapest, they are gradually becoming a thing of the past due to the use of modern finishing materials that are not friendly with drying oil.
|
| Gypsum cement | Such putties, as a rule, are universal and suitable for all finishing work both indoors and outdoors.
|
| Water dispersion | It has a gypsum-cement base mixed with water-polymer emulsion and is sold ready to use.
|
| Acrylic | Acrylic Putties They have many advantages, but they also have a drawback: they can not be painted with cheap, low-grade paints. Due to the fact that the surfaces are very smooth, such paints simply can’t hold on to them. It should be said that if it is planned to paint surfaces (walls), then it is best to use this material as a final finish. Moreover, it is perfect for this. |
Filling technology
There are several options for putty. It all depends on the plane that will be processed. This work is best done with your own hands, because then the price will be affordable and everything can be done efficiently.
Drywall
Drywall putty should preferably be considered separately, since it has its own characteristics.

| Wall cleaning | If it is supposed to putty the walls with old plaster, then you need to remove wallpaper or paint from them. Such walls may have an old whitewash, which must be washed off, guided by the instructions. After this, the room must be dried in a natural way.Before starting the puttying work, the walls are checked again and, if small fragments of wallpaper remain on the walls, they should be removed using an installation knife or a spatula (see Preparation of walls for putty according to technology). |
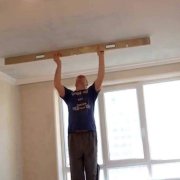
| Checking the evenness of the walls | To do this, use the rule and the flashlight: the rule is put against the wall, and the flashlight is illuminated from the back. As a result, all irregularities are visible: mounds and depressions. The hillocks are knocked off immediately, and the troughs are marked with a pencil, circling the trough. |
| Tool preparation | Firstly, after each putty, the tool should be very thoroughly washed and wiped. Particular attention should be paid to utensils in which the putty is mixed. It is in it that dried clumps of putty can remain, which will then reduce all work to nothing. You should also check the cleanliness of the nozzle on the drill (mixer). |
| Kneading | Putty is kneaded according to a technology that has alternately performed procedures:
After the mixture is ready, it is not recommended to add either water or dry putty to it: what mixture is obtained, this is what you need to work with. Missing the amount of water, as a rule, happens for the first time, and then the movements are brought to automatism, and the amount of water and dry mix is determined “by eye” - this is already a skill.
|
| Relief alignment | As a rule, the leveling of the surface is reduced to filling the depressions, since the tubercles or sag are already knocked down during the check of the evenness of the walls.
|
| Drying | Drying of the putty surfaces is carried out in natural conditions, without the use of any heat generating units.
|
Putty for wallpaper
Putty is produced with a wide spatula with strips, with overlapping strips from 10 to 25%:
Attention: The angle between the spatula and the base of the surface is maintained within 20-30 degrees, while the thickness of the putty layer will be in the range of 2-4 mm.
- After that, the surface is left for drying, after which it is processed with a grid jointer and checked for evenness. If necessary, putty is repeated taking into account roughness, and so on until the wall is completely leveled (there can be up to 5 approaches or more).
- After full surface alignment, they pass with an abrasive jointer with mesh No. 80-120 for better grinding of the surface. Then you can start wallpapering.
Putty for painting
The putty technology is the same, but another operation is added to this technology:
- At the final stage, the surface is putty with finishing putty.
- For this, high-quality acrylic putties are used, which are then sanded with an abrasive mesh with No. 150 and not lower.
- Before painting, the surfaces must be primed.
Putty corners
Putty corners takes a lot of time. Usually in the corners they leave a lot of sagging, which are then removed by grinding, but this does not make the task any easier.
- You can use a corner spatula, but not always the angles are straight and its use is not always justified, since working with it is not so simple. Many puttyers were not used to corner spatulas: they always have them, but they do not always use them.
- Corner processing can be simplified if there are grooves in the corners that need to be filled with putty.
- To do this, you can use a tube of silicone, filling it with putty and using a “gun” to fill such a seam: very quickly and efficiently.
- It remains only with the help of an angular spatula to spread the putty evenly over the entire corner. Then the corner is treated with abrasive sandpaper.
The technique for using the silicone tube is as follows:
- After the tube is released, it should be well cleaned and wiped with a rag soaked in table vinegar;
- During puttying, the angle is left free, according to the drawing;
- The tube is filled with putty, and with the help of a “pistol” its contents are squeezed into the groove from the bottom up, forming a kind of “sausage”;
- Using an angular spatula, leaning on the walls, the “sausage” is evenly distributed on the surface of the walls;
- After drying, the abrasives are removed with the help of abrasive.
Attention: As an option, for such purposes, you can use a plastic syringe by installing additional gaskets in the “gun” so that it takes its place in the “gun”. The syringe kit also includes various nozzles, which increases the scope of this "trick".
The technology of puttying slopes is no different from the technology of processing conventional surfaces.
So, the putty of the ceiling made of drywall is not such a complicated process and it is quite possible to cope with this work. Watch the video in this article and the photo, decide on the material. The instruction will help you do everything right and not miss anything.