How is puttying for painting the ceiling

Putty for the ceiling for painting the task is not so simple. This is the largest plane and all errors will be immediately visible.
Immediately you need to decide how to putty the ceiling before painting and then do the job correctly. This is what our article will be about. You can see the main points in the video in this article and the photo will also help you.
The content of the article
Ceiling finishing work
Puttying the ceiling for painting is done only after its alignment. In some cases, you can do it without any preprocessing, but if done plasterboard plaster for painting and if the drywall itself was fixed correctly. All work is done in several stages, each of which is important.
Preliminary preparation of the ceiling
Putty for the ceiling for painting begins with the preparation of the base plane. Namely, its alignment, the removal of all kinds of irregularities.
It is obvious that a competent putty of a regiment requires a certain skill of work and knowledge. But the most important thing is to choose the right materials that will be used for this purpose.

So:
- In an apartment, the situation is a bit more complicated: first you need to get rid of the previous layers of decoration, clean thoroughly of paint or wallpaper, and try to level it out to the maximum (see Plaster leveling the ceiling - how to do it right).
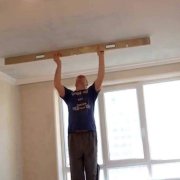
- First of all, we look at the evenness of the plane itself. To do this, we pull the fishing line along the diagonals of the room. And you will immediately see deviations.
- If the deviation is more than one and a half cm, then you have to do the alignment of the plane first. And if the layer should be higher than three cm, then this is best done with drywall. Putty of the ceiling from drywall for painting will be done after its installation.
- The primer is a special solution that not only enhances the stickiness of the putty, but also prevents the surface from “absorbing” moisture. As a rule, putty should be applied in several layers, at least twice, especially if the ceiling is uneven.
- Initially, in order for the ceiling surface to be prepared for puttying, a primer is used. Wet putty holds well and dries evenly.
Choosing the right primer is an important point, while taking into account what material the ceiling is made of: concrete, gypsum board ceiling and others (see Types of construction primers and their scope) It is convenient if the primer solution is poured into a small tray and applied to the ceiling with a special terry roller. The ceiling can be primed from the floor using a roller on a long handle.
What will be needed for work
They mainly use spatulas, a puncher, and a nozzle for mixing.

- Small spatula has a size of 10-12 cm, large - no more than 16 cm. A special tool (small and narrow) can be used for work in difficult to access places, for example, where heating pipes are located.
- Buckets are used as containersthe volume of which is approximately twenty liters (one with water, the other where you can mix the putty powder).
- Do not forget, for the performance of such work it is better to use clothes that can be stained, and rubber gloves.
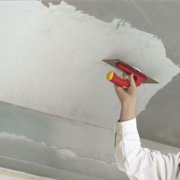
Ceiling putty steps
A rough coat is applied, the so-called starting putty. It is coarse, and looks a bit "rude." Nevertheless, such a structure helps to smooth the surface and eliminate the imperfections of the plane.
| Choose a mixture | For work, it is possible to use ready-made putty in the form of a mixture or dry powder. The first option is suitable for those who do not want to waste time kneading, and do not worry because of the significant cost of such material. In addition, the working mixture is allowed to be used for several weeks or months, while dry mixtures must be used for a couple of hours. |
| Training | To begin with, a complete preparation of the plane is done. We also prepare the material for this donkey. First, water is poured into the container, then the dry mixture is poured out of the bag so that it protrudes slightly from the water. Mix with a mixer, wait 20 minutes, and mix again. The consistency of the finished mixture should look like thick sour cream. During kneading, you can add dry powder or water to adjust the consistency of the mixture. |
| Application | Technology is important in this matter. Without this, you will not get a quality surface. |
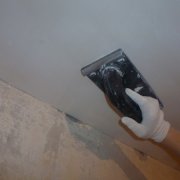
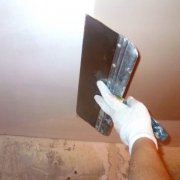
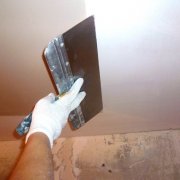
Material application
The technology is quite simple, only some practice is needed:

- From the bucket with a small spatula we collect putty;
- Smoothly apply the material evenly on a wide working spatula;
- A large spatula must be applied to the surface, conducting it to itself, until all the putty remains on the ceiling;
- We repeat the process further, trying to adhere to the same pressure on the tool. There should not be a large layer of putty up to four millimeters;
- During puttying, it is nice to immediately overwrite the narrow strips that remain after the tool with the subsequent movement.
If you are going to putty for the first time, then the first few meters of the ceiling surface will become a kind of platform for training with your own hands. However, having learned, you will be able to putty the surface pretty soon and without difficulty.
Attention: It must be remembered that starting work must be from the very corner of the room. For this work, you will need either a stepladder, or, as an alternative, special construction stilts. But we do not recommend using them without sufficient practice.
Primer
In all three of the above cases, puttying and ceiling painting do it yourself primer primer surface. For what?

Attention: If putty falls off when painting the ceiling, then this means that you did not make a primer and the material is not fixed firmly. Here it will be necessary to remove everything with a chisel and after that apply everything in a new way.
- The primer fixes the surface, saturating the concrete and the rest of the plaster with liquid polymers. The hardening of the polymers creates a relatively thick and strong layer on the surface of the ceiling, which will no longer fall apart when the humidity or temperature sway.
- Penetrating primers improve surface adhesion to all types of putty and paint.
- In the end, primer on spongy surfaces reduces paint consumption by a factor of 100. With a difference in price between soil and water emulsion several times this is more than advisable.
A primer penetrating defects in the area of the ceiling is applied only with a brush: the roller will not help to ground all cavities and irregularities with the soil. If the room is infected with a fungus, an antiseptic primer is first applied. It will eliminate the occurrence of mold in the future.
Caution: Instead of a primer with antiseptic properties, any liquid with a high chlorine content will do. Based on sodium hypochloride, whiteness is an excellent and inexpensive option. Of course, this method is not suitable for long-term protection against fungus.
Putty concrete plane
Now let's see how the work is done on the concrete plane:
- Starting putty is applied first in all recesses. A medium width tool is used.
- Putty gives a slight shrinkage, as a result, in significant recesses, the procedure will be repeated two or three times. Before the secondary putty, each layer must dry.
- Next, the ceiling is processed manually or with a grinder. All visible flaws are removed. The joints of the drywall sheets on the suspended ceiling are glued with paper tape.
- Finishing putty is applied in one or two layers; The final layer thickness should be about a millimeter. In this place it is better to use a wide spatula.
- If you don’t have any experience with plastering, follow a simple algorithm: apply two extremely thin layers.
- Often only defective areas of ceilings are putty; Nevertheless, on the entire surface of the ceiling, professionals advise applying the final putty, and also on drywall.
- The finishing putty of the ceiling for painting and the secondary primer of the entire putty surface with a penetrating primer is the last final stage. After drying, you can take on the roller.
Plaster ceiling putty
Currently, such a building material as gypsum board can rightly be called indispensable for leveling the ceiling. Even if you are a person who does not understand anything about this, you can easily install drywall (see Plasterboard ceilings and walls: tips from the master), since this building material can be called high-quality and able to interact without difficulty with different types of finishes.
Puttying with your own hand is done like this:
- During surface priming, special attention must be paid to the seams.
- Puttying holes with self-tapping screws. First you need to make sure that they do not go beyond the sheet. To do this, it will be enough to use a spatula, having drawn it along the sheet. Next, you will need to manually tighten everything that extends beyond the borders, and then putty on it.
- Then you should prepare the seams. Preparation should be done on the short sides of the sheets, as well as on the place where the sheet was cut (in this place you also first need to deepen the seam, cutting the edge at an angle of 45 degrees). Then it is necessary to fill the seam with the help of starting putty, glue the masking net in such a way that it is recessed, let's say, in the seam. After that, you need to glue the entire seam on top of the sickle, making the surface even.
- Then you need to putty the hole of the screws, as well as sanding the seams.
- Ultimately, you need to make a putty on the ceiling with a putty finish.
In general, there is nothing complicated in this, but everything has its own nuances. It is worth remembering that the putty layer should be minimized, since there is no need for a thorough smoothing of the surface.
After the putty dries, you can already sand the surface to get a perfectly smooth ceiling. Puttying for painting the ceiling is not a complicated matter, the correct technology is important. The instructions will help you make no mistakes. After looking at the photo you can make a work plan.