How to plaster the ceiling: do it yourself

Ceiling how to plaster correctly, we will consider today in detail. All work can be completely done independently, only it will be necessary to carry out a certain technology for the preparation of the solution and its application. You can watch certain moments of work on the video in this article and photo. An instruction will also be offered that will not make mistakes.
The content of the article
Rules for conducting work on plastering the ceiling
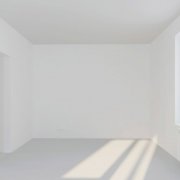
We will now consider the ceiling as plaster in detail. After all, all the little things are important here. Otherwise, the coating will not last long. The volume of work can be large, so it is better to purchase a grinding machine. It will help you quickly level the plane after puttying, and the quality will be on top.
Tools that are used during leveling the ceiling
The quality of the plane will largely depend on the quality of the tool. After all, you will display it and all the irregularities of the instrument will be immediately visible.
- Three different versions of spatulas made of metal are used, and the edges should be even. Deformation is not allowed.
- You need a 15-20 liter tank with high edges that will protect against dropping drops during the mixing process, and it is also desirable that the container has straight walls, this will allow you to easily take the entire mixture.
- To prepare a ready-to-use mixture, you need a mixer.
- Primer is applied with a brush and roller.
- The ceiling for painting will be finally sanded with sandpaper.
Training
After seeing how to plaster the ceiling of the video correctly, you will see that preparation is being done first. After all, the durability of the coating will depend on this.
Attention: Immediately you need to determine the level of application of the plaster. To do this, we pull the fishing line along the diagonals of the plane immediately look at the deviation.
So:
- If the deviation we have is more than two cmThen it will be necessary to carry out a full-fledged plaster.
- If the deviation is less than two cm, then it is quite possible to do with a simple putty.
- We look at the plane, it must be tapped with a hammer and determine the detachment of the previous coating.
- If there are cracks, then they need to be expanded by a couple of cm so that the solution qualitatively fills the cavities.
Sometimes there is a plane and even, then we do as follows:
- First you need clean the ceiling of old paint, whitewash and the like, and only then it will be possible to transgress to level the surface.
The quality of subsequent operations directly depends on thorough cleaning of the ceiling. A spatula is usually used to clean the surface. - It is possible to clean old paint on the ceiling surface in a dry form, but in this case you will waste your strength. This can be avoided by wetting the ceiling surface with water and eliminating the draft in the room.
- As a result of this procedure, the old paint on the ceiling will bubble, allowing you to easily clean it. After final cleaning, the ceiling should be thoroughly washed.
- The next step is to choose a leveling method. This will make it possible to determine the choice of material, since the primer material is directly related to the leveling method.
Depending on their purpose, building materials intended for the preparation of the mixture are divided into several types.
- First type material, these are those that are used under water-based paint.
- Second type used during plastering or puttying.
- And finally, the third type of materials, these are universal materials that can be used in both of the above cases.
Plastering is a universal leveling method (seePlaster leveling the ceiling - how to do it right), it can be used to level both surfaces made of wood and the surfaces of various objects made of other materials. Prior to applying the plaster, preliminary work is underway with the ceiling surface.
So, our plane is flat and we just have to apply plaster. Everything can be perfectly done with your own hands, then the price of decoration will not be large.
Now directly how to plaster the ceiling with your own hands:
- Firstly, the entire ceiling area must be very well cleaned of any contaminants, special measures must be taken against mold and other stains that may be of fungal origin. Such stains should be well cleaned with disinfectants. If the mold occupies a large area, then it can simply be burned.
- Then you need to carry out a primer, which should include reinforcing components.
- Before applying the primer, it is advisable to treat the concrete surface with a special apparatus that creates an uneven surface, this will improve the adhesion between the primer and concrete.
- In cases of wood or from a steel ceiling, before applying the plaster, it is covered with a metal mesh. The mesh cells are 10x10 millimeters in size. To strengthen the mesh to the surface, special nails with a wide hat are used. The mesh covers the entire surface, including the seams.
Make a solution
Now consider how to make a mortar for plastering the ceiling. In this matter, you should immediately look at the application layer and after that make a choice.

- If you need to do just putty (see How to breed putty with self-repair), then you can just purchase the dry mix in the store.
- If you need to begin to level the plane, then it is best to do this with a simple cement composition. Then it will be much cheaper and after leveling, walk along the plane with a dry mixture based on gypsum.
How to install beacons
The installation of lighthouses has an important role during plastering; in many cases, plastering works use lighthouses. From the correct installation of beacons the quality of the plaster depends, if all the rules are taken into account, then in the end you can get a perfectly smooth surface.

So:
- Leveling is the starting process during the installation of beacons. To do this, first select the zero point and with the help of a paint cord, it is soaked on the walls.
- The first lighthouse is installed at the lowest point of the ceiling.
- Lighthouses are installed on small marks of gypsum, which are applied under them. Stamps should be applied with extreme caution, if there are many connections between them, this will lead to an error.
- Since the layer of applied plaster does not exceed five centimeters, the height of the beacons should also not be more than this. The height level of the beacons is synchronized using a two-meter level. The implementation of which is carried out after the installation of all beacons.
After installing all the beacons, you can begin to prepare for plaster:
- First you need to prepare the necessary solution.
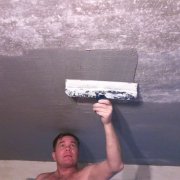
The method of applying the solution depends on the material from which it is made. If it is a gypsum mortar, then the waiting time between the first and second application is twenty minutes, if cement then at least two hours. In the case of a lime mortar, you must wait until the first layer begins to turn white, however, it must not be allowed to dry out. - The next step is to apply an even layer of spray.
- Several layers of primer must be applied to the spray, while the drying time of the layers must be observed. Primer layers must be applied very carefully, each layer must be treated, they must be even and the thickness of the layers must not exceed the height of the beacons.
- Lighthouses and stamps are removed when the last layer of plaster is applied, and their places are closed with a mixture.
- After the beacons are removed, it is necessary to check the evenness of the surface. During the inspection, defects can be detected that can be eliminated by cutting or applying an additional layer.
- The completion of the plaster will be the application of a layer that will cover the entire area. This layer should be even.
Attention: In cases when differences are found on the ceiling surface with a depth of not more than five centimeters, dry mixtures are used to level them.
Dry mixes are used in cases where there is no large-scale work, they are profitable from a financial point of view. In Germany, the best of dry mixes for plaster is produced, which is based on gypsum.
After the preliminary elimination of irregularities with plaster is completed, it should be transfered to putty.
Ceiling Putty Process
In order to smooth out small differences on the surface of the ceiling, putty is used as the most effective method in this case. Plaster and putty differ from each other in that (see Putty and plaster: what is the difference between them), which, unlike plaster, putty fills much smaller cracks, the size of which does not exceed 1000 micrometers. Given this fact, the putty is used to eliminate smaller defects, it can be applied both to wood and to other surfaces. Using putty, you can even out the ceiling area.

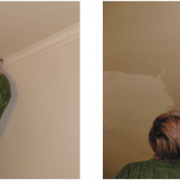
- Before applying putty, you must first clean the ceiling of stuccounless of course the ceiling was plastered. After cleaning the ceiling from various contaminants, putty should be applied, given that it is applied with a very thin layer.
- If on the surface there are minor irregularities, then they can be eliminated with the help of a construction skin. After that, it is necessary to put a paint grid on the necessary area. This mesh is fixed to the ceiling with either glue or nails. Many builders call this net serpyanka because it is very similar to gauze. Nowadays, a lot of options for sickles appeared on the market, among them there are self-adhesive.
- After finishing the preliminary work, you can proceed to the preparation of the putty solution. This requires shifting thirty kilograms of dry putty mixture with twelve liters of water. You need to alter quickly, for this special mechanisms are often used. Such mechanisms are a construction mixer or a drill equipped with a special mixer.
- When the mixture resembles thick sour cream, then the solution is ready for use.
- The prepared solution tends to dry quickly, so all further work must be done very quickly in order to avoid unnecessary costs of finance and time. To apply the solution, you need two spatulas, one of which has a narrow and the other a wide canvas.
- First, the solution is applied with a narrow spatula to a wide spatula. After this, the solution must be applied to the ceiling. It must be borne in mind that it is not worth the time to smooth out the irregularities that have arisen. All defects are easily removed after the solution dries.
- After applying the last layer of the solution, the surface must be properly sanded. In order to achieve the most effective result, it is advised to purchase all the necessary materials from one manufacturer.
Grinding the plane
After applying the solution, we wait for it to completely dry.After all, we still need to process the surface, especially if you will paint the ceiling.

- Immediately walk along the surface with a large mesh construction grid. After processing, there will be sinks on the surface. We will see them right away.
- We make a solution, but only a liquid one. After that, they fill the sinks with a narrow spatula. We are waiting for complete drying.
- Again we process the surface, that is already a grid with a smaller cell. So do until the plane is completely flat.
- Now grinding is done using the construction mesh with the smallest cell.
Attention: If you have a large plane, then for grinding the surface it is better to purchase a grinding machine. Its price is not expensive, but it will allow you to complete the work much faster.
How to plaster the ceiling you already know and understand. Take your time and do quality plane preparation. A video on how to plaster the ceiling correctly will show the correct course of work. If you listen to the advice, then the cover will serve you for many years.