Tiling the basement: make a choice

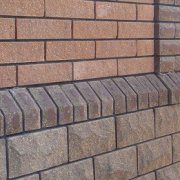
Facing with a socle tile is quite common. This is great material to do the job.
Facing tiles on the plinth exist in various versions of its manufacture. Sometimes it's even hard to choose.
In this article, we will consider what kind of facing tiles there are for a socle and give them characteristics. You can watch photos and videos on this topic and then make your choice.
The content of the article
What sets the plinth trim apart
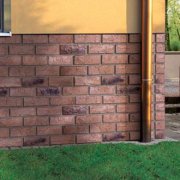
Facing tile for the cap is available in various materials. Therefore, it is important to choose the right one.
Attention: The tile for facing the basement of the house should have a number of characteristics that are simply necessary. Therefore, it is worth paying special attention to the material of production. Pay attention to how much it withstands temperature extremes and high humidity. These are extremely important parameters.
So:
- Material can be produced in various shapes and colors. So it’s easy for you to pick it up. In this case, you can make a completely unique design of the basement of your premises;
- Tiles for facing the plinth are available with the necessary characteristics. They have a non-porous structure and therefore do not absorb moisture.
And neither are frost-resistant and are not exposed to the environment. The material can absorb moisture no more than 3 percent. Such content cannot contribute to the destruction of the material; - Facing tiles for the basement of the house has a small thickness, so you do not need to do additional reinforcement of the foundation. This design is not very heavy;
- Facing the basement of the house with tiles can very well be done with your own hands and without resorting to outside help. And this will significantly reduce the cost of the entire structure. This attracts no doubt;
- Facing socles tiling is not an expensive pleasure. The price is not high, so almost any person can afford such material.
But the basement can be tiled with natural and expensive stone, it just all depends purely on your desire;
This design has its drawbacks. There is no ideal.
And you should know about this:
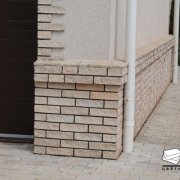
- Tiles and stone for facing the base are often used, but they have their own difference. This is the thickness.
The tile is attached cleanly to the wall. The stone is attached to the wall, but it is much wider and therefore more stable and will last much longer; - With this option, you will not be able to make the insulation of the basement of the room. There is no frame where you can hide the insulation.
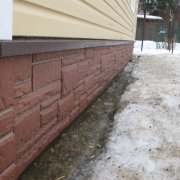
Attention: Work must be performed at a temperature not lower than -5 *. And at the same time there is no difference, cladding of the base is made with clinker tiles or is it facing the base with concrete tiles.
You can really use winter solutions. But practice shows that it is possible to make stone masonry on it, but the tile with this option will not last so long.
Correct installation of basement tiles
Facing with basement tiles is done almost identically, and this does not depend on the material of manufacture. Let it be a concrete tile for facing the base or clinker tile for facing the base, you can even apply granite plates for facing the base, all the same, the principle of work does not change and everything is done according to the technology and the correct execution of the work.
Surface preparation
Tiles for facing building socles are attached to a properly and qualitatively prepared surface.The durability of the entire structure will depend on this.
Therefore, this work should be performed as follows:
- We do an inspection of the surface and remove all the old coating;
- Now so, if we have a brick surface, then we should deepen the seam to a depth of about one cm. To do this, use a chisel and a hammer.
If the plane is concrete, then notches should be applied to it, this is done with an ax; - Now we need to measure how thick we get a layer of solution. For this we use fishing line and construction level. The fishing line is pulled diagonally and the level determines the correctness of finding the plane;
- The next step we have according to plan is the application of a building mesh to the surface. To do this, we drive nails into the seam.
If the masonry is strong, then we resort to the help of a punch. Holes are made and a screw is screwed into them. But this is with brickwork.
With a surface of concrete, we immediately do everything with a punch; - Now we put the mesh on the surface;

Attention: Before putting on the net, do not forget to put washers on the hats that will not allow the net to fall off and increase the meshing strength.
- After securely attaching the mesh, take the primer and apply it to the surface.
Now we need to mark the beginning of the tile fastening. To do this, we mark and mark it.
It must be parallel to the ground, otherwise the geometry of the arrangement will be violated:
- We put the risk on the wall and after that it must be correctly transferred to other surfaces. To do this, it is best to use a hydraulic level.
It is he who will allow this to be done most correctly. It can be purchased at retail or made by yourself. Move the mark; - Now we need to connect the received points. This is most accurately done using a simple nylon thread. We just connect her points and beat off
Now we have a start for installation, from which we should not take a leave.
Tile fastening
This is not such a difficult job. But it is done according to certain rules and in compliance with technology.
It can be completely done with your own hands and without resorting to outside help.
Make a solution
For each material, its own solution is suitable. The most commonly used cement.
And to clinker tiles, he does not fit. Therefore, we will talk about two versions of this mixture
Cement mortar
This is the most acceptable material for fixing tiles.
It is applied practically to the fastening of any material:
- We make a cement mortar. For kneading, we should prepare a container. It is desirable that it does not have stiffeners along the edges and bottom. Then this work can be done most qualitatively;
- This mixture is made on the basis of sand and cement. In this case, the proportion 3/1 is applied and this is when using cement M300;
- First, sand should be poured into the container and cement should be added to it in the required volume. After that, mix the composition to dry;
- Add water in the right amount and mix. We need a completely homogeneous mass with a viscosity at the level of thick sour cream.
To do this, it is best to use a drill with a nozzle. This is not a tricky device that will help to make a quality solution.
Attention: Such a composition settles rather quickly. To avoid this, you just need to add a pinch of any washing powder into the solution. And you will not have this problem.
Clinker tile mortar
The mixture for this material is selected in accordance with the manufacturer's recommendations. Often they are sold complete with tiles.
Therefore, before buying such material, carefully read the instructions and recommendations.
Caution: Some recommend masonry from the top and down. So, this is not worth doing. Such an installation is detrimental to the quality of bonding surfaces. According to the laws of physics, which no one has canceled, the tile stretches down and, in the absence of emphasis, will shift.
Base tile installation
All work is done according to certain rules that you should know. First you need to decide how you will do the laying of the tiles.
This is done in two ways. The first is a seamless fastener and the second is a cladding with a seam.
In the first case, the work is simpler, so there is no need to make strong measurements, it is important to qualitatively adjust the surface. In the second option, you will have to increasingly turn to the help of the measurer.
So:
- To begin with, a spray is made on the surface. To do this, make the solution liquid and spray it on the laying surface. It is to prick, and not pour. To do this, use any bucket;
- We wait until the coating dries. Now so.
If you need to lay a layer of mortar less than one cm for laying, then this can be done by fixing the tiles. If the layer is larger, then the surface should be trimmed, - To do this, simply apply a layer of solution to the surface with a spatula. In this case, it is not necessary to apply a layer of thick, up to one cm will be enough.
If you need to apply a larger one, then wait for the previous one to dry out and apply the next one. And so do until complete alignment; - After preparing the base, we proceed directly to the facing. To do this, you first need to re-sort the tile.
To do this, we pull it out of the packs and take measurements and put it in three piles. The average will be the largest. With it, and should begin work;
Attention: Before starting the installation of the tile, a metal profile should be attached along the fastening line.
It will indicate the line of fastening and it will be better to keep order on it and not slip. To do this, you can apply a profile of any size, the main thing is to position it exactly along the installation line.
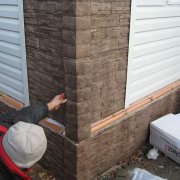
- Fastening starts from the angle of the plane. At the same time, it should be borne in mind that if you are laying for jointing, then the seams should not match.
For this, the fastening begins with the whole part and the next row from half; - Never apply mortar without trying on parts. First you need to place it dry and then adjust.
Parties should be of high quality. For fitting, we use a grinder with a cutting wheel; - Apply the solution to the tile using a notched trowel. After that, we press it to the plane and make slightly rotational movements.
It is necessary that the element is completely seated and there is no air in the seam. It is unacceptable; - When fastened, the solution will appear along the seam. It should be removed immediately with a spatula.
If the mixture gets on the front part, then immediately remove it with a rag. Otherwise, it can penetrate the surface and then it will be quite difficult to remove; - If you plan to make a different color after fixing the seam, then after fixing the tile, go along the seam with the corner of a spatula and remove the solution. Otherwise, after complete solidification, you simply will not do it.
If you are thinking of making the seam with the same solution, then we wait until it dries and then fill the seam. Some do this with a rubber spatula. If the seam is wide enough, then in a plastic bag you just need to cut off the corner and after that fill it with mortar and squeeze it to fill the seam completely; - When mounting, you will need to adjust the installation angle. To do this, it is best to use plastic crosses, which are on sale.
Moreover, it is necessary to withstand the correct seam, for this, plastic wedges are used. But it’s best to apply a template that is done in advance. Then you get it perfectly perfect.

Attention: You should never start fastening a new row without checking the installation of the previous one. This is best done with a fishing line. After all, the offset is one mm. can give a deviation on one running meter per centimeter. Take it seriously.
After fixing the tiles, it is worthwhile to treat the surface with protective agents. They are in free sale.
It is best used on a wax basis, they repel moisture and keep the surface in good shape for quite some time. Now you have instructions and you can safely get to work.