Tiling columns: work

From year to year, there is a constant increase in construction sites, on which experienced craftsmen carry out the construction of new residential and industrial buildings, and are engaged in lining and interior decoration. In particular, such a side of repair and decoration works as facing columns with tiles is also developing.
Tiles and mosaics for many years remain the most important types of decoration for all kinds of buildings.
The content of the article
Tiling columns, self-decoration tips
Mosaic and tile for facing columns affect not only the strength and quality of the structures built, but also on their external condition, making houses more attractive. Thanks to modern innovations, the assortment has expanded significantly finishing materials, which reduce physical and material stress and improve the quality of the finish.
Depending on the purpose, the cladding can be of several types:
- Protective.
- Acoustic
- Sanitary and decorative.
By their names, everything becomes clear.
The protective lining is designed to protect the columns from the negative effects of the environment:
- Exposure to moisture.
- High and low temperatures.
- Direct exposure to fire.
- Mechanical damage.
- Chemical exposure.
Note. Acoustic lining absorbs sound, contributes to the maintenance of sanitary standards necessary for the operation of the premises. Decorative cladding improves the appearance of the surface of the columns.

For reference. Ceramic tiles are used immediately to achieve all of the above goals - to decorate surfaces in accordance with the requirements, to protect the columns, to maintain appropriate operating conditions for the columns.
A column is a support that can be faced:
- Plain liquid plaster.
- Papered with wallpaper.
- Tiled.
- Plastic panels.
- MDF.
- GKL.
- GVL.
Let's consider in more detail:
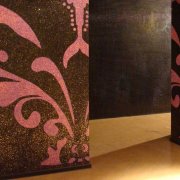
- In most cases, of course, it is recommended to choose a tile for facing columns. This will allow you, once having spent more time and effort, then for a long time not to think about the repair and about such an event as facing the columns with tiles.
- Of course, everyone carries out the choice of finishing material independently. This process often depends on its aesthetic features, on the conditions in which the columns will be located, and on the price of materials and work associated with them.
Facing columns with ceramic tiles is a fairly simple event that everyone can do with their own hands.
Facing tile columns: instructions and features

Initially, it is necessary to properly organize the workplace.
It includes the following required items:
- Capacity for solution,
- Mobile table for tools,
- Tiled space
- Forests if the columns are tall.
- In addition, do not forget that the columns must also be prepared for the upcoming work.
For reference. Before you start facing the ceramic tiles of the columns, you must clean it from the previous finishing material. Dust particles and other possible debris are also removed from the column.
So:
- So, if before the column was pasted over with wallpaper, go with foam plates, then all this must be torn off.
- Plaster that is already crumbling must also be dismantled. If it is in order, it will be enough just to apply a primer layer to the column.
- Minor irregularities in the columns can be fixed with tile adhesive during the cladding process. Strong curvatures are best removed immediately, otherwise the columns tiled will look messy.
As for materials and tools, you will need:
- Directly tile
- Tile adhesive
- Notched and flat spatula,
- Building level,
- Plumb
- Lace
- Rubber mallet,
- Grout
- Plastic crosses.
Facing columns with ceramic tiles, stages of work

After all the tools and materials are ready, you can proceed to laying the tiles directly.
Works:
- To do this, you first need to draw guidelines that will allow you not to depart from the correct horizontal and vertical layout. After all, the columns as a result should be perfectly smooth, and not falling.
There is nothing complicated in this process, so you will do without instructional video instructions. - First, the plumb line is strengthened at the level where the tile will approximately lie. Horizontal landmarks are set with a lace either with the help of rails, or it stretches from one wall to another.
So it is necessary to act on all sides of the column. It is for these limiters that you will need to lay tiles. - The next step involves the preparation of tile adhesive for masonry. It is sold in stores as a dry mix, so you need to dilute it with water.
The proportions according to which the solution is kneaded are indicated on the package with glue. In order to stir it, you will need a construction mixer or drill with the appropriate nozzle.
Tip. Do not immediately knead a large amount of solution, as it can dry even before you finish the lining. The best is a batch of 6 - 8 kg of dry mix.
- The finished solution should be moderately thick, so dial some of it onto the spatula and tilt it. The solution should very slowly slide off it, and not fall off in pieces, and not drain.
- The glue is applied to the column from the bottom up, first with a flat spatula with a thickness of not more than 4 - 5 cm. After that, it must be leveled already with a notched trowel.
It is necessary to apply a little so that about 1.5 - 2 rows of tiles are placed on the glue. No glue is needed on the tile itself. - Attach the tile to the column and push it very hard, aligning it with the available horizontal and vertical landmarks. Where it is difficult to cope on your own, it is worth using a rubber mallet.
- Between the tiles, plastic crosses must be inserted to help keep an even distance between them.
- It is also necessary to act with all other sides of the column (seeColumn decoration: doing it right) At the same time, do not forget about the construction level, because all the rows should be perfectly even.
- Upon completion of work, the finished masonry must immediately be washed from excess glue, and after that, crosses can already be removed from the seams. If this is done too late, then this process will be difficult to implement.
- The seams the next day can already be filled with grout. You will also get it dry, so, like glue, dilute it with water. After mixing the powder, put it in a dark place for 10 - 15 minutes, then stir again and proceed to grout the seams.
This is done with a rubber spatula so as not to scratch the ceramic tiles.
Tip. So that the seams are neat, the grout should be slightly adjusted not only with spatulas, but also with the grout. In this quality, a pen or pencil can be used.
Wash grout is much easier than tile glue, so this event can be delayed until the next day. But at the same time, pay attention to the fact that tiles with a relief pattern or pattern will be more thoroughly washed.