How columns are plastered

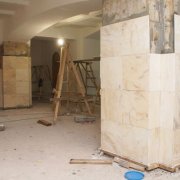
Columns are the most beautiful architectural and constructive elements of buildings, which not only take on certain loads, but also perform decorative functions. They can have a square, round or multifaceted section.
Of course, plastering tetrahedral columns is much easier than plastering, for example, round columns with flutes. To carry out such a finish is almost impossible without the appropriate skills and knowledge.
Using the video in this article, we will try to fill this gap, and tell you how to plaster pillars and columns.
The content of the article
Preliminary suspension
The result of the plastering work, regardless of which surface is leveled, directly depends on such a technological operation as hanging. And the more complex the shape of the column, the more complicated this process.
- Take at least columns with entasis: their distinctive feature is the mushroom shape - that is, the trunk is thicker at the base, and it narrows at the capitals. There are also columns with double entasis, which have the greatest thickness in the center, and the narrowing goes not only to the capitals, but also to the base.

Note! To plaster such a column, you need a special rule, which, as the model, will repeat the bending of the surface. How it looks can be seen in the photo above. You can make it yourself: for this you need to measure the magnitude of the narrowing using a straight rail and a ruler, and draw a smooth curved line on the board from which the rule will be cut.
- If a tubercle appears on the surface of the column, it should be cut as far as possible. When this is not possible, it is possible to hide the protrusion in only one way. In this case, in all other areas you will have to increase the thickness of the plaster coat.
In the next chapter, you will be presented with instructions for the construction of stamps and beacons on the plastered surface of the columns.
Device stamps
When hanging straight columns, the arrangement of beacons is no different from how it is done on the walls (see Stucco beacon: types, purpose, installation) In their upper part, a nail is driven in such a way that the distance from the cap to the base surface corresponds to the thickness of the plaster. A mark is arranged around him, and a plumb line is tied to the hat, and one more nail is hammered below.
- Further, between the extreme marks, pull the cord and hammer the nails in the gap. How many of them will be, masters are guided by the height of the columns, and the initial state of their surface.

If it is necessary to plaster several columns, and they are arranged in one row, then first they are hung up on the extreme columns, and then a cord is stretched between them, along which marks are arranged on the others.
Curved Columns
Columns with varying diameters are suspended in a slightly different way. To begin with, measure the radii in the thick and thin parts of the trunk.
If the entasis is located only on top, then a nail is hammered at the base of the column and a mortar is made, the thickness of which is usually 2 cm. Next, a plumb line is lowered from the capitals so that the twine touches the nail head.
- Now, in the region of entasis, from the plumb line, you need to measure the distance corresponding to the difference in the thickness of the columns.To fix this mark, a nail is also hammered in the tapering part of the column. You need to do this together: one person holds a plumb line, and the other measures the difference in radii and makes a mark.

- The next step is to make marks across the entire radius of the column. To do this, small portions of the solution are thrown along the ring, at a distance of 2-3 cm from each other, in small sizes - palm-sized. Then a plumb line is passed from the side, and the protruding parts of the stuck-in bosses are carefully cut along the line of the cord.
The result is accurate marks, the surface of which serves as the main reference point for the construction of beacons, and they should encircle the columns around the entire circumference. They are arranged on all types of round and semicircular pillars.
With a barrel height of an even column up to five meters, at least two such rings are made. If she has tapering spots, then there may be more ring marks.
Lighthouses
The plastering of round columns is distinguished by the fact that in addition to stamps, lighthouses must also be arranged on them, which should also surround them around the circumference. To do this, you need to make a template ring, which you can see in the above diagram.
Do it like this:
- Of the two wide boards 25 mm thick, they shoot down the shield with their own hands. On it you need to draw a circle that will correspond to the diameter of the column plus 2 cm (thickness of the screed). This can be done with an improvised compass: a pencil tied with a thread to a self-tapping screw.
- If the column in the cross section has the shape of a polyhedron, then the template must also have the corresponding contour. In this case, the polyhedron must be inscribed in a circle, guided by knowledge from school geometry. After the outline of the column is drawn, the rail connecting the two halves of the shield is removed, and cuts are made along the contour drawn on the boards.

- The places of cuts are well cleaned and polished, after which the halves of the shield are again folded together. For a circular straight column, one template is sufficient. In the presence of entasis, they are made at least two, or even more - it all depends on the specific configuration of the trunk. The template is installed on a ring mark, and so that it does not slide down, cloves are clogged under it or the solution is smeared.
Then, all the gaps that exist between the circumference of the template and the surface of the column are filled with solution. When he grasps, split rings can be removed by lightly tapping the tree with a hammer.
If shells form on the lighthouse after removing the template, they are closed and the surface is smoothed. In the process of plastering, the rule is established by beacons, and, guided by them, the surface of the columns is pulled.
Plastering process
The technology of plastering rectangular columns does not provide for the device of stamps and lighthouses - it is enough to hammer in nails, according to which the rules will be established. And so that they do not bend, small portions of the solution are sprayed between the nails in several places. To draw straight tetrahedral columns, two, or even three rules are used at once.

So:
- Two long rules are set vertically, on opposite sides, fixing them so that their ribs protrude beyond the column plane to the thickness of the screed. Then, a solution is spread between them, which is leveled with the third - a short rule, or a half-tier. How it all looks is clearly visible in the picture above.
- As expected with improved plastering, at least three layers must be applied to the surface: spray, primer and topcoat. When the mortar is set, the screed is thoroughly overwritten, the rules are outweighed on the opposite side, and the “ruts” remaining from them are closed up and overwritten.

After that, after all four faces are plastered, they are taken for stretching (rubbing) the sunscreens - the outer corners of the column. To do this, you need a special tool: an angular half-grater, which you see in the photo above.
Round columns
The more complicated the configuration of the columns, the more difficulties they have to be plastered to overcome. Accordingly, the price of such work also increases. This is especially true for columns, on the surface of which there are horizontal or vertical recesses - rustics or flutes.
- We’ll talk more about them, but for now we’ll figure out how to smooth smooth round columns. About how to perform beacons, it was already mentioned above, in a separate chapter. Now, pay attention to the process of drawing the surface. In general, it looks like this: between the lighthouses a solution is poured, a rule is pressed against them, and, moving it from top to bottom, remove excess solution.

- After the third coating layer is applied, the surface of the column is wiped with a trowel and smoothed. If the round column has an entasis, they work on regular places with the usual rule, and on curved ones - with the rule-pattern, which was also mentioned above.
For this purpose, specialists often use the same patterns with which beacons were arranged. Dividing the template into two profile halves, they work, as a rule, by stretching the surface in two steps.
To make plastering better, the column is broken into grabs - and the more there are, the more accurate the result will be.
Flute finish
In architecture, flutes are called vertical recesses on the column barrel, located at a small distance from each other. If such elements are on even columns of rectangular section, then they are pulled out using a template with an appropriate profile.

- Cut it out on a board, to the ends of which strips, called sleds, are nailed. After two rules are fixed on the sides of the column, a template is installed on them, to which the runners are nailed to the slide. These are also slats that allow the template to move by the rules without slipping off them.
- The stem of the column is pulled with a template, but at the base and pilasters, the flutes are finished manually. At the same time, they use a small, ruler and cut-off - a special plaster blade with a narrow and long canvas, designed to perform small jobs. Grouting the surface of the recesses with a piece of foam or a tissue swab.

- The process looks even more complicated when flutes are present on an entasis column. Once the trunk narrows, it means that the recesses on it also narrow. A rocking pattern is required to extend their surface. That is, he should be able to move along the rules not in a straight line, but obliquely.
- A board with a profile for the swinging template is cut across the width of the thickest part of the trunk. For the installation of movable ears with holes, an allowance of 10 cm is left on each side of the profile board. It is shrouded in a thin steel sheet and fastened to the sides of the slide.

- If the template is assembled correctly, the slide must move freely and without any problems change its position relative to the board with the profile. When the solution has already been thrown between the rules, a template is installed on them, and they move it from bottom to top. In the place where the column narrows, the template warps, and only one side moves forward.
The sections of the flutes that are not reached above and below, as well as the furrows remaining after removing the rules, are completed manually, after which the entire surface of the column is smoothed.


This is not the first time we ourselves have been making the rule for mushroom-shaped forms. It is not too costly, but the result will always be exactly the one that is required. It’s a pity that the columns are now not as popular as before.