How to fix the lining to the wall: do according to the instructions

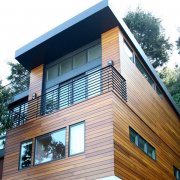
Among the whole variety of modern finishing materials, there is one that does not go out of fashion and has remained in demand for many decades in a row, and this despite a number of negative quality characteristics and difficulties. We are now talking about a wooden lining, a material that is rightfully considered the most environmentally friendly and safe.
With it, you can create the most intricate designs, and all repairs can be done with your own hands. And in this article we will talk about how to fix the lining to the wall, and reveal a few secrets of the masters.
The content of the article
Preparatory work

Any master will tell you that the repair should begin with a thorough and detailed preparation. It depends on how quickly and efficiently the repair will be made, and how many nerve cells you will have at its completion.
First of all, this is of course the calculation of wall paneling, let it be better for you to have a few extra panels, which can then be used in the event of a defect than several segments are not enough.
Well, the first thing to prepare is a tool. There aren’t any tricky devices here, but it’s better if everything is at your fingertips and you don’t have to spend time looking for all the little things.
So, laying the euro lining on the wall is done using the following tools:
- Instrumentation. Or simply put, meters. this concept includes tape measure, pencil and chalk thread for beating straight lines. You can easily do without the latter, but as a rule, any home master has such a thread in stock.
- Wood hacksaw or electric jigsaw. In principle, the lining can also be cut with a grinder, but if you live in an apartment building, be prepared for the fact that neighbors can call firefighters, since there will be a lot of smoke.

- Building level. Not a single repair can do without this tool, and it is best if it is a modern laser device that can greatly simplify the process. Of course, not everyone can afford a laser level, so you can replace it with the simplest one, with a watermark.
- Hammer and drill to it. The tool is a thunderstorm for all neighbors, but, unfortunately, one cannot do without it.
- Brushes and other paint tools. Lining is rarely used in its raw form, so you have to work a little painter.
- Hammer. Where without him. One of the most important tools in the arsenal of a home master.
In principle, this is the whole simple set that we will need, and most importantly, that it is always at your fingertips.
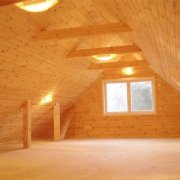
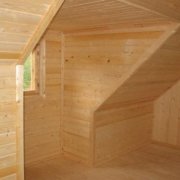
Panel Preparation

As we have already mentioned, wall paneling usually undergoes additional processing. This may concern many factors, for example, if you use material of a class below category A, then it will have to be sanded, rubbed and cleaned up possible nicks and cracks.
There will be no such problems with a class A or extra lining, but you still have to work on the brush. Processing the lining is necessary with special compounds, which, fortunately, are sold in any hardware store in an already finished form. Such impregnations prevent the effect of moisture on the tree, and as a result significantly extend its service life.
In addition, by impregnation you can give the tree any color, so the interior with the clapboard on the walls is so diverse despite the fact that the same wood species was used to produce this material.

Advice! Before proceeding with the processing of panels, cut them to the desired size, this will not only save on impregnation, but will also make it possible to process the ends of the panel.
The impregnation dries quite quickly, but some of them can emit very unpleasant chemical odors when dried, so it is better if after painting the material will stay for several hours on the balcony or stairwell. In the meantime, our lining is drying, it's time to start another very important and responsible preparatory stage.
Wall preparation

Despite the fact that the lining is attached to the wall through a wooden or metal crate, the surface itself must also be processed. This primarily applies to the primer (see Types of construction primers and their scope), which is applied to the surface and penetrates inward, prevents the formation of fungus and mold.
Condensation on the walls is a common thing, especially if there are cold bridges on them, so do not regret the impregnation, the more it will be, the better and more reliable the protection will be. But before you take the roller, the surface must be thoroughly cleaned from the old finish, the cleaner the surface, the better.
Old wallpapers can be disposed of with a spatula and a soap solution (see How to remove wallpaper from the walls correctly and without torment), which is applied to the wall and absorbed for several hours, after which the coating is easily removed, almost without residue.

Getting rid of the paint will be harder (see How to wash off the paint without problems), especially if PF brand paint was used, but since the technologies do not stand still in any hardware store, today you can find a special wash that, when in contact with the paint, dissolves it almost without a trace.
Another important point is the possible oil pollution, which also need to be eliminated. If those are present on the walls, they should be abundantly moistened with a solvent or kerosene, which will dissolve the oil base, and the residues will be washed off with warm water.
After all this, the wall can be primed. Drying time, depending on the temperature in the room, can vary from an hour to five, so now there is time to rest, and prepare for the next step.
Crate

Before attaching the lining to the wall, for it you need to create a foundation, or as experts call it - a crate.
To do this, you can use several materials:
- Wooden beam. The most preferred material for the manufacture of crates. Firstly, it is in excellent contact with the lining, and secondly, it is much easier to attach to it.But here it is important to remember that the beam for the crate also needs additional protection, and for this you can use the same impregnation with which the lining was processed.
- Metal profile for drywall. Many consider it to be a more preferable material than wood. The metal lasts longer, and does not have thermal expansion, as is the case with timber. But there is one significant difficulty - in contact with water, the metal begins to rust and corrosion, can penetrate even through wood fibers. As a result of this, yellow spots often form on the surface and cannot be removed.
- Metal, galvanized profile. If you still decide to use a profile for the manufacture of crates, then let it be better covered with a layer of zinc. The price of such a material is slightly higher, but it is less susceptible to corrosion, and will last much longer without harming the decorative component.
Important! The galvanized profile should be cut only with special scissors, and in no case should you use a grinder, which, due to high speeds, simply burns the upper protective layer, and there will be no use from the coating.
Marking

At this stage, the laser level would be very useful, which is capable of applying perfectly even stripes in all the necessary places, but as we already said, pleasure is not cheap, so you can do without it.
Important! Fastening the lining to the wall always occurs perpendicular to the crate, that is, if you place the lining horizontally, then the guide crates will go vertically and vice versa.
First of all, it is necessary to install and secure the extreme guides. They should be behind the floor and ceiling by about five centimeters. This is quite enough for fixing the eurolining to the wall without difficulties.
So, we retreat five centimeters from the bottom and top, and guided by the testimony of the building level, we draw even stripes around the entire perimeter of the room. Particular accuracy is unimportant here, but it is still better if the crate runs without any distortions.
Now that we have the extreme lines, take a tape measure and measure the distance between them. We divide the result by two, and at this distance we draw one more line. Now we have two sections on the wall, which also need to be divided in half, and put a mark again.
Thus, we divide the wall until the distance between adjacent marks decreases to 50-60 centimeters. It is this distance that is considered optimal, and the wall from the lining will be even and without sagging.
So, the marking is ready, and you can go directly to the fastening of the guides.
Guides

It does not matter which beam will be fixed in the first place, do as you prefer. Fastening takes place directly through the body of the bar, just apply the bar to the wall, and drill a hole with a puncher in both the tree and the wall.
A special plastic dowel is hammered into the hole, which will firmly hold the guides and press them to the base. But there is one complication - all guides must go strictly parallel to each other. If your walls are smooth and without significant differences, then there will not be any difficulties, but if there are obvious defects, then you will have to lay a small wedge under each mounting point in order to achieve evenness of all surfaces.
The fact is that a dried tree is difficult to bend, of course, with some effort, you will pull the lining to the bars, but in this case it will be in constant tension, and it is possible that over time, the board will either burst or tear out the fasteners , returning to its original form.
Everything is ready, the crate is in place, and there is only a lining on the wall, but do not rush, check the reliability of all the fasteners again, if you better spend now, at first glance, a pointless exercise an extra hour than later you have to redo the whole section walls. And with such interventions, the probability of marriage is very high, and extra costs will be inevitable.
Lining installation

Before you make a wall for eurolining and go directly to installation, we strongly recommend that you watch the video in this article, which shows detailed instructions, and the wizard describes the entire process in detail.
And now, we proceed to mount. You can start a lining set from any direction, it all depends on your convenience.
There are four ways to attach panels:
- On the nails through the body of the panel. This is the easiest way, but it is not suitable for living quarters, as the nail caps will be in sight and will spoil the whole appearance. But if you are finishing some kind of utility room, such as a garage or a veranda, then this method can be used completely, but you need to be extremely careful, since a well-dried tree can simply burst from a hammer blow.
- On the nails in the groove of the panel. This method is much more complicated than described above, since the nail will have to be hammered at an angle, and accidentally hitting the panel will be even more disastrous for it. This method is good because the fastening is hidden, and the nail heads are completely blocked by the next panel, and 10 years ago, this was the only way to decorative fastening.
- On construction brackets. Simple and reliable way. Panels break through a powerful construction stapler. The brackets themselves are practically invisible, you can only consider them with a detailed study, which rarely happens in the case of wall decoration.
- Kleimers. Kleimers are special mounting brackets that are inserted into the groove of the panel and are fastened with a nail or a self-tapping screw to the crate. This is the simplest and most common method to date, which practically eliminates the appearance of marriage risers kleimers are very cheap, so they will not affect the total cost of decoration, and therefore it’s not worth the risk, and it’s better to immediately take this method of fastening into service.

Regardless of which method is chosen, fasteners should be made as carefully and accurately as possible. Any accidental hammer blow on the panel will leave an indelible mark on it, and you will either have to replace the segment, or enjoy the unsightly appearance of a dent.
Well, that’s basically it, our decoration is ready, and it remains only to clean it of building dust and dirt, and how to wash the wall paneling on the walls, you can read in one of the articles on our website.
And now, you can safely enjoy the work done, and of course the result. It is noted that the repair made by yourself, looks much better than ordered and brings much greater moral satisfaction.