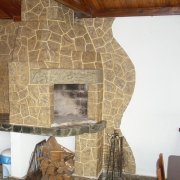
Facing furnaces with artificial stone

Facing stone stoves is done for a long time. But the price of natural material is quite high and artificial is replacing it.
Such a facing stone for furnaces is commercially available and moreover, you can choose not just a color, but choose the right size. Today we will tell you how to do the facing of the furnace with stone with your own hands.
The content of the article
Advantages of fireplace decoration with artificial stone
Facing artificial stone for furnaces has a lot of advantages:
- The technology of finishing the furnace with artificial stone is very simple, this is due to its soft mechanical characteristics;
- The preparation and laying of the elements does not require much effort, for this you only need a grinder;
- Facing stoves with stone can be completely done with your own hands and therefore it is possible to make the design much cheaper.
- The composition of the finishing stone contains light and soft fillers that lighten the weight of the final structure;
- A large amount of material is offered in retail, the elements of which have a different configuration and shape, which makes it possible to select any pattern without special difficulties;
- The cost of artificial stone for decoration is an order of magnitude lower than natural, which can significantly reduce the cost of the finished product;
- Using this material allows you to embody any of your design ideas.
And on our resource you can learn more about using tiles in the interior.
Rules for choosing an artificial stone
High-quality furnish of the furnace artificial stone is possible only with the correct selection of components.
Attention: The stone for facing the stoves can have different sizes, so you should immediately pay attention to this. You should have as little waste as possible. Therefore, it is worth pre-drawing everything on paper and correctly making the calculations.

The main selection criteria:
- Take an interest in the time of presence on the market of the manufacturer. The longer she does this activity, the better.
- Before purchasing the product, be sure to check the availability of hygiene certificates and certificates of compliance. In case of their absence, we recommend that you refrain from acquiring. This is a chemical industry, so you should give preference only to high-quality goods.
- The cost of the material. In most cases, the cost of products of foreign manufacturers is much higher than the cost of domestic goods.
The lead time allows you to work out the technology and produce quality products:
- Carefully inspect all elements of the material, paying particular attention to its structure. In case of violation of the technological process, the front surface acquires a porous structure, which negatively affects the strength and life of the structure.
- High-quality products are delivered to points of sale in appropriate packaging bearing the logo of the manufacturer.
- Pay attention to the production date. Elements gain maximum strength after 28 days from the date of manufacture. Having seen an earlier production date, be sure that the products will not be of high quality.
Finishing technology
These works can be performed by a person who does not have special qualifications.Although the beginner will not do this, but if at least you can lay a simple tile, then you are offered instructions on which you can do everything yourself.
You need to understand that stone decoration is carried out according to certain rules that must be observed:
- The furnace can be made of different materials. Finishing is done on wood, metal and other similar elements only after a certain surface preparation. For each type of material it is different.
- All work is performed at a temperature exceeding +50C.
- Fixture of a decorative stone for a fireplace is carried out from top to bottom, from one end to the other. This avoids contamination of the elements.
- Pay particular attention to the manufacturer's recommendations regarding which solution or adhesive to use.
- For cutting elements, an ordinary hacksaw for metal is used. It is not recommended to use tools with a large tooth. This can lead to material damage.
- It is worth watching photos and videos. Choose the desired design and color.
Attention: When finishing any surface, you must first completely lay out the picture on the floor. Make all measurements and only after that you can proceed to fastening.
Surface preparation
Finishing stone can be used to finish any type of furnace, but each surface requires proper preparation for installation:
- If your stove is not made of bricks, then their surface is pre-coated with a layer of waterproofing to reduce its susceptibility to moisture.
To do this, use a pigment laid in a horizontal position. Do not forget to make sure that the top row overlaps by 4 cm. Vertical seams also overlap about 8 cm. - After this, you can begin to fix the plaster mesh. For this, special fasteners are used.

- The vertical distance between two adjacent points of the fasteners should be about 12-15 cm, and the horizontal distance of about 40 mm.
- A layer of plaster is applied over the mesh, the thickness of which is about 1 cm.
- Then you should wait until the plastered surface has completely dried.
- In the event that the furnace is made using concrete or metal, the preparation procedure differs only in the absence of the need to install additional waterproofing, which can be found in retail.
- If fixture is made on a brick or concrete surface, then it should be plastered. Before this, notches are applied to the plane.
Artificial stone laying technology
Finishing with natural and artificial stone is almost the same.
To facilitate the work, all elements of the future design are laid out in front of the cladding:
- It is not recommended to perform styling with one type of element; they should be alternated. This allows you to give the final design a natural look. Alternate the thickness, texture and color of the elements. Use items from various boxes.
- Applying the styling of the elements, implying the subsequent jointing, start work only from the top corner of the structure.
- During installation, make sure that the thickness of the joints is approximately the same. You can even use the template. Do not make seams too even, they should be in the same plane, but slightly different in thickness. Try to avoid horizontal seams that are stacked on top of each other.
- If there are significant differences in the thickness of the material and the uneven structure of its surface, do not try to correct the material and eliminate the bumps. Indeed, as a result, the finished design will have a rather harmonious look.
- In the case of using seamless laying, the fasteners of the elements are made from the bottom up. During installation, it is necessary to tightly press adjacent elements.
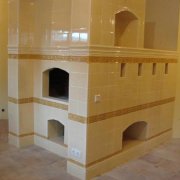
- When performing a brick cladding using rectangular elements, special attention should be paid to vertical joints. It is necessary to control the places where horizontal and vertical lines intersect. Make sure that the angle is strictly 90 °. You can use the template for verification.
Tool List
Before proceeding with the work, it is necessary to prepare the necessary tools:
- Capacity for mixing the solution;
- Smooth wooden block;
- Drill;
- Grinder with cutting wheels;
- Hammer;
- Construction trowel;
- Sprayer or brush to moisten the surface of the material and masonry;
- Nails or screws for fixing auxiliary materials during installation.
Beginning of work
The beginning of fasteners is a very crucial stage.
You need to understand that the final result will depend on how the start of the work takes place:
- It is recommended to start facing from the corner. Installation is carried out alternately with alternating long and short elements.
- First of all, the thickest tiles are fixed using the minimum amount of mortar. This helps in further work.
- To give the design a more natural and aesthetic appearance, fit the elements in size. To do this, you can use a hacksaw or wide nippers. The machined sides are mounted so that they are located above or below the angle of view.

- A half-centimeter layer of solution is applied to each stacking element. For this, a trowel is used. It is necessary to control the distribution of the solution, the surface should be covered with a uniform layer of the solution.
- When laying, the elements are slightly pressed and slightly moved to various positions. This contributes to the complete filling of the seams and the proper fixing of the elements.
- During laying, the mortar should protrude slightly from the seam.
- For seamless installation, special attention is paid to the end seams. Watch them complete. To do this, the solution is applied to the entire surface of the element (excess is removed during shrinkage). Then excess solution is removed using a trowel.

- When fastening to a too dry surface, the laying plane and the elements are moistened with a spray gun or a regular paint brush. You can put styling elements in a container of water. After two minutes in the water, they are completely ready for installation.
- For seamless installation, each element must be wetted with water, regardless of the weather.
- After contact with the solution, it is not necessary to remove it immediately. Wait until it dries slightly.
Rules for joint stitching
To give the masonry a more aesthetic and natural look, it is necessary to complete the filling of the joints with mortar. For this, it is recommended to use exclusively branded embroidery materials.
Avoid using mixtures intended for laying ceramic tiles:
- To completely fill the seams, you can use the bag to fill the seams. It can be made independently. To do this, cut off the corner of an ordinary plastic bag. Make sure that the hole is slightly smaller than the fill seam.
- Fill the bag with a solution (do not pour a lot). By pressing on the bag, we displace the solution into the seams. Make sure that no liquid gets on the front surface.
- We wait until the solution dries a little, and with the help of a trowel we remove its excess, while pressing it into the seams. Do not remove the sag immediately after filling, as this may stain the front surface.
- Using a pan of plant material, completely clean the seams. The use of solvents is strictly prohibited.
- Barking is the most important stage of work, completely eliminating the ingress of moisture into the structure.
Completion of work
After the surface has completely dried, it is treated with a hydrophobic composition, forming a translucent protective film on the treated surface. This prevents the penetration of moisture and facilitates dust collection.
Such a coating is resistant to temperature extremes and does not collapse when the structure is moving.
Using the same technology, fireplace mantel with artificial stone. And more about this can be found on our resource.

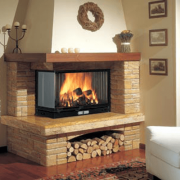
Facing the stove with stone, unlike the portals of fireplaces, is not the most, probably. classic way to finish. Still, traditional methods such as tiling or, if the stove is in a village house or in the country, stucco and whitewashing are more familiar with the stove. Not every interior will fit a large mass of stone or brick.
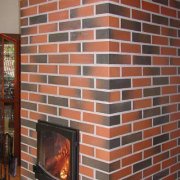
Another point to pay attention to - the texture of stone and brick is able to collect dust. Have to spend more effort on cleaning.
But the finishing work itself, in the case of choosing this material, is easier. Such precision fit, as when using tiles, is not required.