Tiling stoves and everything about it

Facing with stove tiles is most in demand and is quite common in everyday life. Tile for facing the furnace is available for sale and its price is not so high, so people immediately pay attention to it.
The content of the article
Material selection
Tiling the stove begins with the right choice of material. Indeed, in retail there are quite a lot of products that are simply unsuitable for this work.
There are some important criteria that you should pay attention to in any case, choosing a ceramic tile (see Production of ceramic tiles and its features) Let's look at the criteria by which a facing refractory tile for a furnace is selected.
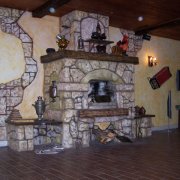
- The stove can be tiled, but there is also clinker tile for facing the stoves. It should be noted that the second option is more time-consuming and specialists will have to be invited here.
- Tile stoves must be lined with the necessary material for this, it should ideally suit this design. In that case, if you want to finish the decorative structure, then of course, you especially can not worry.
As soon as you begin to purchase tiles, you definitely need to study the moisture resistance of the material, remember that there are materials on sale that can absorb moisture, of course, then such material will not be able to hold out for a long time.
So you need to carefully study the instructions in order to do everything correctly:
- When choosing a facing tile, you should know that you need to immediately look at the heat capacity, since this parameter is the most important, which means you must take it into account. Moreover, do not forget to take into account the temperature at which it will be used, because this is especially important.
Caution: There is another important point. In the event that you begin to use solid fuel for the furnace, then know that the material must withstand temperatures up to 1600 degrees.
- The work should be carried out exclusively by environmentally friendly material, so remember this, choose exclusively trusted brands, as this is important.
- Moreover, the material must necessarily be shockproof, as you can always encounter mechanical stresses.
- Do not forget to take into account the dimensions of the material, because you need to purchase the necessary products the first time, knowing for sure that you are making the right purchase, which will give you a great mood.
Attention: Today, various materials are actively used for the production of tiles, it is best to choose clay, since this is an environmentally friendly product, which means it is ideal for a particular fireplace, consider this.
Completing of the work
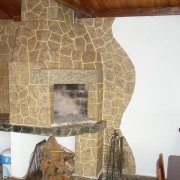
Facing tiles for the furnace are laid according to certain rules. This is not a whim, but a practice.
Some minor details in the work may affect the quality of the lining. Therefore, facing the stove with tiled technology must be fully implemented.
Surface preparation is an important point
In any case, when you start tiling the stove, fireplace, you must carefully prepare the base surface. In the event that this stage of the work is performed incorrectly, then know that the material will not be able to serve for a long time, it will begin to exfoliate.
Therefore, at the very beginning, you need to carefully inspect the surface, thereby removing the old coating, it is best to use a metal brush for this, since this is the most convenient and optimal tool. So you can understand what coating layer you will need to apply so that it is even, for this you need to take a rail, applying it to the surface, a plumb line will definitely help.
- In the event that the layer is less than one centimeter, then know that you can mount the tiles on the surface, but if higher, then in any case, you must definitely level the plane, doing it qualitatively.
- Know that by performing tiling fireplaceYou must consider the thickness of the layer. In the event that the plane does not coincide by one centimeter, then, of course, this does not matter, if more, then it is necessary to put the building mesh on the surface.
Thus, it will be possible to strengthen the adhesion of surfaces, moreover, this will seriously affect the long term of the structure, never forget about it.
Solution preparation
Remember that your fireplace can please you for a long time, only if a quality solution is used:
- If we are talking about a decorative fireplace, then there is nothing complicated here, you can always make fastening on tile adhesive for facing stoves. The mastic for tiling stoves is also on sale. You just need to know that such materials can not always withstand high temperatures.
- It is best to make a solution for facing the stove with clay tiles. This is a natural material that can withstand almost any temperature.
- If cladding tiles are used for facing the furnace, then you will have to purchase a special solution. When laying such material, it will not work to apply tile glue for facing the furnace, it simply will not work. The manufacturer mainly offers its mixture when buying clinker tiles.
- You can make a mortar for facing the stove with cement and sand, but here you need to remember that if you use coal in the furnace, which gives a fairly high temperature, then this finish will not last long.
Attention: Choosing tile glue for facing furnaces, first of all, be aware of what temperature will be during heating. It directly depends on what you drown. Coal and hardwoods, such as oak, give the highest temperatures.
The most popular are cement and clay. Let's look at them in more detail.
Clay solution
Clay mortar for facing and plastering furnaces will be the most optimal material. Although it will have to work hard, but the price will not be high and the quality of the masonry at a height.

So:
- Such a solution, as a rule, has sand and clay in its composition, in order to easily determine the percentage composition, it is necessary first of all to determine the fat content of the clay itself.
Attention: As soon as you start making balls, it is best to number them in advance, write down the data. Remember that this is necessary so as not to confuse the composition in the future.
- Clay must be passed through a sieve, separating garbage, kneading lumps.
- As soon as the composition is determined, it is necessary to make a batch, it is best to use a container without ribs for this.
- It remains to add sand, naturally in the right amount, and mix everything thoroughly, it is best to use a drill with a nozzle, since this tool is ideal for this.
Attention: In the event that you start to use solid fuel for the furnace, then know that you can achieve fireclay powder. It is he who is able to seriously improve the quality of the solution, which means that you will succeed.
Cement mortar
Such glue for facing stoves with tiles is most common. Its price is not high and not difficult to cook. Therefore, it is popular.

So:
- For preparation, cement and mortar are used. The ratio is selected 1/3 for the brand 300.
- Loose mixtures are best sieved first, then there will be no lumps and it will be homogeneous.
- Mix and add water. After that, we bring the composition to a state of thick sour cream. After that, it is ready for use.
Caution: It is best to use mountain sand in a cement mortar. You should also add a pinch of washing powder into it, then it will not settle.
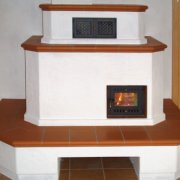
Tile fastening
Now you need to understand how to tile the stove correctly, for this it is best to use some important recommendations, performing the work in the appropriate order.
- First of all, you need to lay out the tiles from the packs, thereby sorting them by size. You have to make three heaps, taking into account the size, the average and will be the largest.
- It remains to lay out the tiles in full size on the floor, taking into account the gaps between the tiles.
Attention: There are two options for fastening elements, this is without a seam, as well as with a seam, which means you should be aware of this. The first option is simpler, so you can qualitatively fit the edges of the tile, and the second option is a bit more complicated, here you must definitely maintain the same size between the tile and the installation angle.
You need to purchase crosses made of plastic and wedges, so you can maintain the size without any problems, doing it correctly and efficiently, which is important.
- Once the layout is done correctly, you can proceed to the cladding, you need to start laying only from the bottom corner. At the very beginning, you need to apply the solution to the tile, for this use a comb spatula, after which the tile needs to be pressed to the surface by pressing.
Attention: In the event that it is necessary to apply a layer of more than two centimeters, then know that you should not immediately put it on such a height, you will need to make a liquid solution by spraying the surface using a bucket.
Remember that you must definitely spray the solution, but do not pour it, as many beginners do, not knowing what they are doing wrong. It remains to fix the tiles, try to do this work carefully and efficiently.

So:
- Many beginners make another serious mistake when they apply the solution to the tile immediately. In fact, you do not need to do this, first of all, you should try on a row on a dry one, thereby adjusting the plane, after which you can start applying the solution.
- After laying each row, it is necessary to check its parallelism, it is best to use the construction level for this, since this tool will allow you to do this without any problems.
- Having completed the lining of the plane as a whole, you should allow the solution to dry, then you can begin to fill the seams. In order to make a certain color, it is best to add dye to the mixture, mixing thoroughly.
- Specialists perform this work as follows. They take a cellophane bag, then cut off a corner in it, then put a solution in the middle, thereby filling a hole through the seam.
You must do this job carefully, because the solution should not get on the front of the fireplace, as there is always the opportunity to spoil its appearance, so you need to consider this in advance. But if suddenly this happened, then do not worry, you can always remove the influx with a rag.
- As soon as the plane is completely lined, it is necessary to allow the surfaces to dry, it usually takes at least three days, after which you can begin to apply a protective coating, wax mixtures are ideal for this, they are available for sale.
Now you yourself understand that tiling the stove is not as difficult as it seems.This means that you need to approach this issue properly, responsibly and comprehensively, because only then can you realize your ideas and dreams.
Moreover, the work will be carried out qualitatively, you can evaluate it as it should, because it will be done with your own hands, and this cannot but rejoice. So, everything is in your hands, which means that try to do everything right, then you will surely succeed.
Before starting work, you should look at the photos and videos and draw up a work plan. After that, you can proceed.
Also on our resource you can find out how facing of stoves with tiles.

They came up with an original way of sealing inter-tile seams, I have already worked, but the idea of such a simple and convenient method did not visit me. Managed to use it already. I will say one thing, that, in principle, the option is working, just do not put too much solution, it is both inconvenient and not practical, it is better in small portions. I have a level, I use it for even laying of tiles, by the way it is much more convenient than working with a building level. Moreover, the level can be used in different planes, while visibility is constant and clear, the results are simply incomparable with the usual level.