Lining cladding: the correct execution of work

Lining the house with clapboard is quite common. There is a cladding with a plastic lining and you can see how a cladding is made with a wooden lining.
Both the first and second options are acceptable. But for the inner surfaces, the second option is more acceptable, and for the outer the first.
This article will be devoted to this issue. You will be able to see photos and videos on this topic and select material for decoration.
The content of the article
Choose by type
Lining essentially has two types. It is wooden and plastic.
Each is good in its own way. Let's see where each type is best.
Plastic option
The lining of the pvc lining is perfect for outdoor decoration.
Let's look at its distinguishing features:
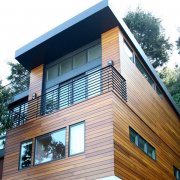
- Facade cladding clapboard from the outside, it is a durable construction that does not lend itself to decay and environmental influences. It tolerates temperature extremes;
- Cladding the exterior walls with a PVC lining will save you from expensive maintenance, it just will not be required, unlike a wooden structure;
- You can simultaneously warm the room and this is best done from the outside of the house;
- The lining of pvc clapboard is not very heavy and you do not need to strengthen the foundation and you will save money on this;
- The price of the material is not high and almost everyone can afford it.
Wood paneling
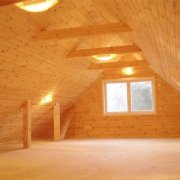
This type of decoration is also popular, only work with this material is done from the inside of the room.
Let's look at its distinguishing features:
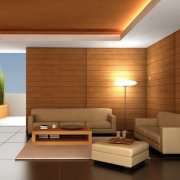
- This material looks pretty pretty. Those more than its price is quite different. Starting from budget options and ending with expensive breeds;
Attention: If you have a desire to make expensive wood finishes, but there is not enough money, then do not despair. In retail, there are antiseptics that change the appearance of the wood structure to expensive species. Only it should be worried about this in advance, such work takes time.
- For example, cladding a bath lining, this is the most optimal option for decoration. You then keep the heat as much as possible.
And you can make additional wall insulation. The lining for the cladding of the bath is preferably selected in hardwood, never stands for steam room finishes apply conifers.
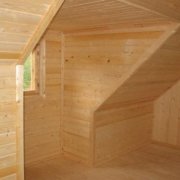
When heated, tar may be released and you may damage the skin; - Wall decoration makes the walls less heat conductive and saves heat.
Cladding of houses with clapboard is also done with wooden material, only it should be well prepared. This will be discussed further.
This material is divided into species. This is the usual and eurolining.
For decoration, it is better to choose the second option:
- The spike in the euro lining is much larger, which makes such a design more reliable. Therefore, you can not particularly worry that gaps will appear with a temperature difference;
- Wall paneling for house cladding should be selected with a humidity of up to 12% and this parameter is fully maintained in the euro wall paneling, which cannot be said about the traditional one;
- The price of such material is not much higher, but you will spend much less effort during installation and save a lot of time on fitting;
- Cladding of facades with lining is done with ventilation, otherwise the material will deteriorate, for this lining in each part special cuts are provided for this, which will significantly extend the service life of the structure;
- For such material, higher-quality wood is selected in which only live knots are allowed and, moreover, only of small diameter, and therefore it is more durable.
Correct installation
Wall covering do-it-yourself clapboard begins with the installation of the frame. Some suggest first applying a layer of insulation and then making a frame.
This can be correct only with a wooden surface. But if the material is concrete or brick, then it will be quite difficult to do it right away, so it’s much easier to make the frame first.
What is required
For continuous and proper operation, we need the following things:
- Lining wooden in the right amount. Remember when buying, you should also consider waste. Calculate this necessarily;
- For a wooden surface, self-tapping screws will be required, according to the length, calculate the frame fastening according to the height. For hard surfaces you will need to purchase a dowel.
In this case, remember that the attachment points are made at least 40 cm; - To fix the lining, nails are needed, their length is selected on the order of 23 mm;
- To carry out the cutting of material, stock up with a hacksaw or an electric jigsaw;
- A hammer, but not large, choose a small one, it is more convenient for them to mount;
- Deep penetration primer for the base plane.
Surface preparation
This is not a difficult job and you will do it fast enough:
- In the first cases, we remove everything from the surface that will interfere with the mount;
- After that we do an inspection and look at the surface to peel off the previous coating. If it is, then we eliminate it with a chisel and hammer;
- After that, it is worth making a primer coating, this is done with a brush or spray gun;
- Now we need to identify the line of attachment. If you have a basement finish, then you can perform according to its installation line.
If not, then draw a fastening line. To do this, make a mark on the surface; - We transfer it to other walls, for this it is worth using the hydraulic level, which eats on the free market. Or you can do it yourself. With its help, this can be done quite qualitatively;
- Now we connect the affixed risks. To do this, just use a nylon thread and beat off the level of fasteners.
Now we have an installation line on which we will be guided.
Frame installation
Lining for facade cladding is attached to the frame, it is the base and therefore it must be done with high quality. The fastening must be rigid and reliable.
Remember, this is not a lining of cars, literally everything is important here. The frame can be made from a metal corner or wood.
One and the other option is acceptable. Only the first is more durable.
Attention: if you chose a tree for the framework, then it should be treated with antiseptics and this should be done in advance. They are commercially available and significantly extend the life of the structure.

So:
- First we need to determine the level of fastening of the cladding. There may be unevenness on the walls and therefore this issue needs to be addressed. To do this, pull the fishing line along the diagonals and see the level of deviation of the plane;
- Now we determine the height of the installation. To do this, you just need to know the thickness of the insulation;
Attention: Here it should be noted that the insulation must not be deformed by the lining, otherwise it will lose its properties. A gap of a couple cm should be provided and then everything will be fine.
- Now we make the frame strapping along the top and bottom of the plane. To do this, we cut the profile or beam into the desired size and fasten along the installation line.
Simple wood screws are perfect for wood. If the surface is concrete or brick, then holes should be made using a hammer drill and after that make a connection to the dowels;
Attention: The frame must be fixed rigidly, so do not use the dowels from the sets.
Acquire individually plastic dummies and then screw them to them, they should be a couple of mm larger from the section of the plastic hole. Such a connection will be strong and reliable.
- Now you need to install the cross bars. It should be attached every 50 cm.
But here it should also be borne in mind that the connection of the lining can only be done on a solid surface. Therefore, the calculation is done according to the length of the panels. We put marks;

- We pull the line diagonally. It will help us make the fastening of the rails in one plane.
It should be perfect, the lining will repeat it and therefore the geometry of the surface will depend on it. Height adjustment is done using gaskets; - Now we need to apply a layer of waterproofing. To do this, take the film and cut it.
Only on the basis that it will not be attached to the joint, to the lap. We cut and fasten. To do this, you can use a construction stapler;
Caution: Place the film correctly. To do this, it must be fixed with the rough side top, that is, to the lining.
- After installing the first frame, we need to fix the insulation. To do this, the mats are fixed on a plane using building fungi.
Remember, the number of mounting points must be at least six;

- After installing the insulation, we make the fastening of the rails, which will contribute to proper ventilation. This is quite important and largely determines the durability of the structure.
For this, we fasten the trims along the first frame, apply a couple of cm thick and about 0.5 mm wide. Such an installation will allow free circulation of air and will facilitate the removal of condensate from the surface.
Caution: on the bottom you will have to install a metal mesh. This will not allow rodents to penetrate.
Lining mount
The lining is mounted on a properly installed frame. It sets the shape of the finish.
Cladding on the frame with clapboard is done in two versions, it is with transverse and longitudinal fastening. This is for installation and not so important, the installation is done as follows.
There are two main options for attaching panels:
- With the help of screws. To do this, drill a hole in the spike and then make a connection.
It is to drill, if you start immediately screwing, then the material can crack immediately. Therefore, do not experiment, do it right away.
The depth of immersion of the screw in the frame should be at least 10 mm. In this case, you can use a screwdriver. Then it will turn out just much faster;
Attention: When drilling a hole for a self-tapping screw, you must immediately make an abasement for the cap. Which should be immersed in relation to the plane by a couple of mm;
- Kleimer mounts are metal and chrome plated staples. True, this option is most used for thin euro-lining and indoors.
Self-tapping screws are more reliable. In this embodiment, a kleimer is attached to the inside of the spike and the second part is immersed in the frame and secured with self-tapping screws.
With such a lining, the first and last panel is fixed with screws and the connection is closed with dowels;

- We make the fit of the material, that is, we cut it to the desired size. Immediately correctly position the first panel.
To do this, it is worth using a plumb line, this is for transverse mounting and for longitudinal it is worth using the level. The first panel is mounted with a spike down and a groove to the top; - We mount the second side in the manner described above. That is, either a kleimer, or a self-tapping screw;

- We take the next element and put it in the previous groove down. The entry must be tight and a mallet is used for fastening;
- So do the full finish of the plane;
- The top panel does not always fit completely, so you need to attach it and make marks on both sides and after that just cut the length;
- In the locations of the fixtures, proceed as follows. Attached item.
Marked the installation location. They removed and made a hole using a drill with a nozzle. Only the crown should be purchased in advance and choose the right size.
Attention: Wall cladding with eurolining is much easier, it is of better quality. It will take less time to fit. And she has special grooves that increase the quality of ventilation. Therefore, this option will be a little more expensive, but much better.
As you can see, all the work can be completely done with your own hands and this will significantly reduce the cost of the work. You just have to attach the baseboard and hide all the errors of the joints.
After that, perform a high-quality finish on a wooden surface. On this topic you can find complete instructions on our website.

And there is another option for fixing the lining with an open and prominent mounting head. It is fastened not with ordinary wood screws, burnished blued, but with nickel-plated hexagon screws. With a clear location has a very pretty look. Something like an old cruiser or a riveted steam train. It is possible to open with a protective varnish after installation, or you can still give the effect of aging on wood. It depends of course on the chosen design.