Ceiling putty for painting: do it yourself

Putty for the ceiling for painting is perhaps the most difficult question. After all, there must be an ideal plane, otherwise everything will be visible.
Puttying and painting the gypsum plasterboard ceiling is a little easier task, you won’t have to do such alignment as on a concrete surface, but you still need the skill and adherence to the technology. Today we will tell you how to putty the ceiling for painting.
You can also watch the video in this article, which will show the whole process from beginning to end.
The content of the article
Ceiling Putty
Ceiling Putty - responsible work requiring experience, the right approach and compliance with important recommendations of specialists. Indeed, only in this case can it be carried out correctly and efficiently.

So:
- To work, you need to purchase tools, these are spatulas of various sizes, a roller, so that it is convenient to apply a primer, a basin intended for diluting the dry mixture and a construction mixer.
- You need to purchase these tools, so you will not be distracted by this, in the process of doing the work.
Attention: As soon as you begin to choose one or another type of dry mix, you must definitely study the recommendations that can be found on the packaging. Remember that it is customary to use putty in order to smooth out certain differences, in case the differences are too large, then the ceiling surface must be plastered in advance.
Preparatory work
Puttying and painting the ceiling begins with surface preparation. This is important both for putty and for painting. The adhesion quality of surfaces and hence durability depends on this.
All this you can do it yourself without any problems and therefore the price will not be high.
The key to the quality performance of the work will be the instruction, which will be lower:
- It is important to note that if the ceiling plates are evenly laid, then all you need to do is remove the remains of wallpaper, whitewash or glue from the ceiling. To whitewash easily and effectively, experts advise moistening the surface of the ceiling with water.
Attention: After the whitewashed layer is soaked, you can easily remove it using a spatula. In this case, you should know that there is no need to wet a large surface at a time, as many often do.
Try to work carefully and step by step, then the surface will turn out not only beautiful, but even, which is what you actually need:
- To achieve better adhesion of the putty to the ceiling, you must coat the surface with a primer mixture (seeWhy do we need a primer: technological nuances of finishing work), which can be purchased at any hardware store.
- It must be taken into account that the primer is applied to the ceiling in two layers, the first layer is applied parallel to the wall with the window, and the second layer must be applied perpendicular to it.
Caution: Often, many beginners do not apply the primer as needed, thereby encountering problems. You should know that you must try to apply the primer evenly, there should be no smudges or traces from the roller brush, respectively.
- The brush should touch the ceiling with the tip of the pile, while remember that the brush must be held at an angle of 60-70 degrees to the ceiling.In the event that your ceiling will have severe differences, steps, before applying putty, you need to plaster the surface of the ceiling, thereby relieving it of significant irregularities, after which you need to prime the surface of the ceiling.
Phased work
All work is done in several stages, each of which is quite important:
- First of all, you need to knead the dry mixture, it is best to do this work with the help of a special mixer, which will allow you to perform it quickly and thoroughly. You can achieve a homogeneous mass, which will not have lumps, and this is important.
Caution: Try to add water to the dry mixture a little, because as a result you need to get a mass with the density of sour cream, so watch the condition of the mixture.
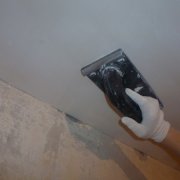
- Putty on the ceiling. Speaking about the process of puttying in general, you should know that it is the same for certain types of putty. Using a small spatula, you need to scoop up a little mixture, evenly distributing it on the surface of the tool.

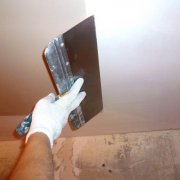
- The mixture must be applied with a wide spatula, so you can do it without any problems, moreover, with a thin layer. After the first layer has dried thoroughly, you need to remove all the bumps, if you notice sagging, then they can be removed with a sandpaper.
- Usually, dust remains after this, it, in turn, can adversely affect the quality of the second layer, which means that it is best to use a wide spatula for leveling defects, since this is the most optimal and suitable tool for this work.
Attention: Putty should not be liquid, it should be brought to an elastic state not liquid. It fits like soft plasticine.
Number of layers
Remember, the more layers you apply on the surface of the ceiling, the more uneven the ceiling. After all, when applying layers, you must achieve surface leveling, remember that you can apply subsequent layers only when the previous layers have dried.
So:
- The number of layers must be determined at the initial stage. To do this, the line is pulled diagonally and a level is applied. You can immediately see the layer that you need to make.
- The first layers should be applied with starting putty (seePutty and plaster: what is the difference between them), it has a large fraction.
- Never apply more than two cm.
- Each subsequent layer is applied after the previous one has completely dried.
Last layer
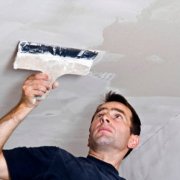
Naturally, the finish layer should be thinner than all the others, starting to apply the topcoat, you should try to do the job quickly so that the mixture could not dry out at the edges.

Attention: The finishing putty of the ceiling for painting is made no thicker than a couple of mm. Here the plane is displayed especially carefully.
So:
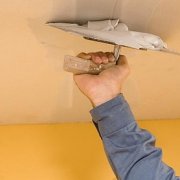
- First, you need to walk along the plane with a building grid and all over. We look, at us all bulges are erased, and sinks remain.
- Knead the solution, only more liquid.
- We go through and fill the sinks.
- We are waiting for complete drying and back we pass along the plane with a construction net. We do this until the surface is completely leveled.
Final finish
In the event that you carry out all these stages of work with one goal - to prepare the ceiling surface for wallpapering, then be aware that experts advise you not to finish finishing sanding at all.
But if you want to paint the ceiling, you need to give it perfect smoothness, for this it is customary to use a small skin that will surely help you cope with this work.
After the putty is dry, you need to use the lamp - carrying, thereby highlighting the surface of the ceiling, so you can notice those or other irregularities that are on it.
Features of plastering plasterboard ceilings
Putty plasterboard ceiling for painting is done according to the accepted rules. But there are also subtleties and features.
Attention: The main feature of this work is that you do not need to level the surface of the ceiling, thereby not wasting a lot of time on this. Putty should be applied for only one purpose, so that you can give the ceiling a uniform smoothness.
So:
- First of all, you must carefully and accurately align the seams of the sheets of material (seePutty of drywall joints - how to do it), remember that often the ends of the drywall sheets have an oblique cut, and this greatly facilitates the alignment.
- As soon as all stages of the work are completed, the seams, joints must be glued with fiberglass mesh, you do not need to think that you can’t do it, since it is not difficult to do this at all.
How to putty the ceiling for painting
Of course, most of the work has been completed and the ceiling is already able to please its owner with an attractive appearance, as well as a flat, smooth surface.
Starting to paint the surface of the ceiling, you should also not forget about some features of this work, so as not to collide with difficulties:
- You need to know that for finishing, you should use exclusively waterproof putty, it should not soak from the water that is contained in the paint. Moreover, it must be firmly held on the surface of the ceiling.
- Using a waterproof primer, you can easily coat the finished ceiling before painting.
- Starting to paint, do not press the roller strongly, you should not drive them a lot in the same place, because it will be immediately noticeable, and the surface of the ceiling will not look the way you want.
Conclusion
Try to do the work carefully and carefully, because only then will it be possible to do everything correctly and efficiently, resulting in an original and attractive surface of the ceiling, in fact, what you dream about.
Puttying the ceiling is an important event, it requires a special approach, which means that if you want to do this work, then you should treat it with all care and seriousness.
After all, all the features and nuances of this work should be taken into account, the only way it can be done correctly and efficiently, even if you do not have much experience in this field.
Whether it is necessary to putty the ceiling before painting, the person who does not understand anything at all can ask. Of course you need. Take a look at the photo and make a list of everything you need. After the purchase, you can take your time to get to work.