Modern floor and wall cladding - porcelain stoneware

Porcelain tile is a modern facing material with high strength, excellent performance and a pleasant appearance for the eyes. It does not apply to porous materials and therefore does not absorb water.
This property makes it an ideal solution for use both for interior and exterior decoration. Porcelain stoneware is not always suitable for walls, but if you managed to fit it harmoniously into your interior, then be sure - it will last for years.
The content of the article
Porcelain tiles indoors
In this article we will tell you how porcelain can be used to decorate your home. And we will start with the inside of it. There is no fundamental difference when facing the facade and interior, so you can assume that all the material is one general instruction for installation, selection and design.
Advantages and more

Like any other building material, porcelain tile has its own pros and cons, which we will announce right now (see Features of porcelain stoneware).
Let's start with the first one:
- Street walls lined with porcelain stoneware are reliably protected from ultraviolet radiation of moisture and temperature changes;
- Porcelain tile for wall construction has high resistance to various types of chemicals;
- Long service life - faced walls do not require maintenance for a very long time;
- This material is artificial, which allows the manufacturer to give it any shape, size, texture and color, so that it can simulate various surfaces, such as wood or natural stone;
- Porcelain tile does not burn and, accordingly, does not spread flame;
- The surface is resistant to dirt, so wet cleaning can be carried out quite rarely.

Well, a couple of words about the unpleasant moments that arise when working with this material:
- Porcelain tile has a solid weight, which is why it heavily loads the supporting structures of the building, and is not suitable for facing on every wall.
Advice! If you want to perform facade cladding of the building with granite, then first get advice from a specialist who will give a conclusion if this is possible in principle.
- The price of porcelain stoneware is quite high - of course, if you do not get the lowest grades. But if you take into account all the advantages of this material, then once you can fork out.
- Porcelain stoneware has a cast structure and high density, which makes it very difficult to cut. For these purposes, high-speed electric tile cutters and grinders with special circles are used. If you try to use a manual roller tile cutter, then be prepared to spoil a lot of tiles, as it often breaks along an absolutely unpredictable path.
Advice! When cutting with a power tool, be sure to use eye protection and breathing protection. During the cut, a lot of sharp fragments fly apart in all directions, and the surrounding area is covered with a dust cloud.

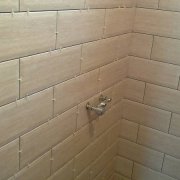
Types of porcelain tile - decorate the interior
In this chapter we will talk about varieties of porcelain stoneware, and demonstrate them in the interiors of houses and apartments.

- And the first on our list is matte porcelain tile. This type of tile is the most popular. It is used primarily for floor cladding and external facades of buildings, since its surface is more wear-resistant. The front side has no shine (factory polishing) and additional substances. This makes this porcelain tile more affordable.

- Polished, it is glossy porcelain. Such tiles after casting and firing are polished with a fine abrasive. Processing gives a mirror shine and adds a rich texture and depth to the texture of the material. Gloss is not the best solution for flooring due to the fact that the surface becomes very slippery, this especially applies to bathrooms and showers, as well as street decoration. But the luxury of the appearance of the material makes many forget about this drawback.

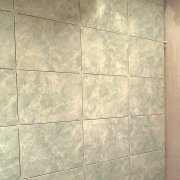
- Semi-polished porcelain stoneware - It has an average level of specularity and is made by polishing finished, trimmed porcelain stoneware. This tile is used for wall cladding. Its surface alternates matte parts with glossy, which gives it a very effective appearance.

- Sanitized, glazed porcelain stoneware - It has a very high resistance to pollution, which is favorable for places with high operational load. This type of tile has a soft shine with a velvet effect, which is achieved by polishing it with mineral salts before firing.

- Glazed or milled porcelain stoneware - is made by analogy with conventional ceramic tiles, by applying a coating in the form of glaze on the front side. It is best suited for wall decoration, although it is also used for floors, but be prepared that over time the glaze will be wiped off and the floor covering will lose its original appearance.

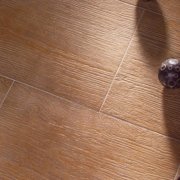
- Textured porcelain tile - It is made by casting in special molds. This technology allows you to create surfaces that simulate various materials: natural stone, wood, leather, textiles and more. It can be used both for interior decoration and building facade.

- Rectified Porcelain Tile - this is essentially ordinary porcelain tile (often glossy), but which has undergone additional processing in order to make its dimensions strictly fixed. Yes, yes - this is the same seamless tile that allows you to lay the material close to each other.

- Mosaic type porcelain tile - made in the form of a small tile, which can be either matte or polished. Installation of such a cladding is quite time-consuming, and requires special tools and preparation.
Porcelain tile is also subdivided according to the type of color: homogeneous or partially painted. The first option is made monolithic and painted only with natural mineral components. The second one has two layers: black and white and multi-colored. The wear resistance of homogeneous porcelain stoneware is much higher, but it is inferior in aesthetic parameters.
Exterior finish
The second part of the article, although it will be devoted to the appearance of buildings after facing with granite, but the emphasis will primarily be on the installation process, using the example of facing the foundation of a brick fence (see Facade cladding with porcelain tiles).
This video shows the decoration of the facade with granite.
Preparation for decoration
As already mentioned - porcelain stoneware is unpretentious material, and therefore they can trim parts of buildings from the outside. But before starting the facing, as always, you need to prepare the surface: level, clean, primer.
Let's talk about everything in order:
- If the surface has significant differences in the plane, then it needs to be leveled. In our case, we are facing a cast concrete foundation, which was filled by hardworking builders from fraternal Vietnam. We don’t know where the customer dug them up, but the work was done, to put it mildly, not very much, and the differences in the plane in places reached 7 - 8 centimeters, which is very bad.

- As a result, we had to bring out smooth surfaces by plastering with cement-sand mortar. In order to prevent such large layers from falling off during operation, the wall must be reinforced by encircling it with a special steel mesh, which is sold in rolls in construction stores.
- The width of the roll, in our case, was 1 m, and we had to cut it in length. For this purpose, a grinder with a circle for metal is best suited. The grid is fastened to dowels, dowels, nails or anchors equipped with hats for fixing.
- But before embarking on filling, it is necessary to thoroughly clean the surface of sand and soil layers - we recall that we lay the foundation of the fence, on which the earth constantly falls due to rains. Use a spatula and a hard-bristled brush for these purposes.
- Irregularities that strongly protrude beyond the limits of the future plane are also lost. In this case, a power tool is used for stripping: a perforator with a nozzle with a spatula and a chop.
- Next, the surface must be primed with a deep penetration composition. Such treatment will increase the adhesion of the base and bind together the remaining particles of dust and dirt, forming a thin transparent film on the surface.

- Processing is carried out with the help of a brush of a maklovitsa - the roller cannot well capture an uneven surface with deep furrows. After finishing, wait for the soil to dry. The exact data contains the composition label.
- To make the surface smooth, we need to set up beacons that can be made of plastic or steel. For speed, we will plant them on a gypsum mixture. As you know, gypsum hardens very quickly, and it is quite difficult for beginners to work with it. We will give a couple of tips on how to increase the time it takes to produce the finished solution.
- The most important thing is the proper stirring, or rather its absence. Gypsum is simply soaked with water. Otherwise, the production time is reduced many times.
- Pour about 1 liter of water into a clean container. Attention! Add to it washing powder or some liquid detergent (for the street you can use milk, but this is expensive), the active substances of which will slow down the hardening of the mixture.
- Start to sprinkle a little gypsum, evenly distributing it on a mirror of water. Do this until a wet crust is formed on the surface. Pick the mixture a couple of times with a spatula, and you can proceed with the installation of beacons. It would be better if pure gypsum was half diluted with gypsum plaster or putty.
- Lighthouses are important to place strictly in one plane. To do this, the extreme ones are set according to the level, and a thread is stretched between them - from above, from below and in the center (if required). The remaining beacons are displayed along taut threads, which speeds up the process quite a lot.

After half an hour, the gypsum will completely harden and you can proceed to the plaster. The solution is poured onto the wall in layers. With a large coating thickness, this is done with intermediate drying to prevent the mixture from sticking.

The drying solution is trimmed by the rule. To do this, hold it strictly perpendicular to the plane of the wall to prevent the tool from bending, especially at long intervals.

The plane of the wall is finally leveled and overwritten, although the last stage can be skipped, because we need a rough surface, which we will be facing. Now the walls must be left to dry.How long does it take? For a layer of 2 cm - about a day at an air temperature of + 25º Celsius and relative humidity up to 75%.
We were not lucky - in May 2017, when the decoration was carried out, the rainy season began in our strip, which watered us mercilessly for days on end. As a result, we waited about two weeks, fearing that the surface was not ready. After drying, the surface is again cleaned and primed in several layers (two to three).
Laying Porcelain Tiles
Laying scheme of porcelain tile on the wall no different from laying ceramic tiles. Moreover, this is done on the same mixture, i.e. glue. We remind you that we do everything with our own hands, for which we attach a detailed photo essay.

We used the professional adhesive mixture CP 65 flex, which has excellent characteristics in terms of strength, moisture and frost resistance. Often manufacturers write that options from the lower price segment are also suitable for outdoor work, but we advise you not to pay special attention to such statements, unless of course you want to lose your lining in the first winter.
Advice! For outdoor use, use only quality mixtures intended for this.

Finishing begins with the side walls of the foundation. Due to the fact that the fence has an impressive length, it is recommended to pre-pull parallel to it a nylon thread or fishing line, which will serve as a guide for us when setting the row. This is done as shown in the photo above.
- Coat the wall with a thin layer (under zero) in the place where the tile is planned to be glued.
- Now apply a thicker layer, and stretch it over the surface with a spatula with a comb. So you create a uniform layer with furrows to squeeze out the excess mixture.
- Make a primer coat of glue and on the tile.

- Next, attach the tile to the wall, and gently pat it on the surface with your palm to better grasp it. Correct the position of the tile, focusing on the thread and the building level.
- Repeat the procedure with subsequent tiles, but do not forget to measure the height before applying the glue, and trim it if necessary. This can be done with a roller tile cutter.

- But it will be much more correct and reliable to use an electric tool. As we already said - porcelain tile breaks unpredictably.

We spread the front row. If the height you have is more than one tile, then start it from the second row, starting the countdown from the bottom.
This is done in order not to lose time on clippings, which are easier to do later. For intermediate fixation, screw a galvanized guide profile PN from under the plasterboard onto the wall.

To set the tiles in height, in addition to standard wedges, use improvised materials. We ended up with scraps of plywood, drywall and porcelain tiles. Crosses, as usual, we use to display the thickness of the seam between the tiles.
After you finish installing the front side, begin to refine the side walls, including the slopes, exposing which use a square to create a right angle. Now we just have to put the top covers, but for a start we will mount an external corner, which will add aesthetics and save from an acute, traumatic corner.
It is done like this:
- Plaster with glue or mortar a horizontal plane to the level of the upper border of the tile, and let it dry;

- Apply a little glue with a spatula to the outer corner with a continuous layer along the entire length of the mounted corner;

- Set the corner on the edge and drown it warp into glue, aligning along the border of the side tile;

- Take a small spatula and collect the squeezed out excess mixture, being careful not to stain the corner;

- Before installing the corner, make all corner cuts, if any. For this purpose, a miter box and a hacksaw for metal are used;

Advice! Never buy corners painted with a hammer paint, do not repeat the mistakes of others! She flies around with metal like poplar fluff in June. Take aluminum corners!
Install the covers from the tiles should be right behind the corner, not allowing him to grab, so you guarantee yourself the possibility of a slight adjustment of its departure.
- We measure the distance from the brick to the nearest edge of the metal outer corner. Do this as accurately as possible, paying attention to every millimeter.

- Cut the pieces of porcelain tile according to the obtained sizes. A grinder for these purposes will no longer be suitable, since it gives a very rough cut that will spoil the entire appearance of the masonry. There are two options: either a manual tile cutter or an electric machine.

- Lay the covers on small layers of glue, remembering to give a slight slope for the outflow of water during rains.

Cutting very small and curly elements from porcelain stoneware is quite difficult. Therefore, we wish you to have such places as possible on your surface.

All places containing gaps will subsequently be covered with a grout with a hydrophobic surface. Complex areas, such as joints between bricks, are recommended to be coated with transparent silicone to prevent water from entering the tile.
If this is not done, then it is possible that with the onset of frost, the ice formed under the lining will squeeze the tile, which can be seen quite often, looking at the facades of buildings on the streets of your city.

After facing with granite, the foundation of the fence found such an appearance. Our tile had a texture under the skin of a crocodile and a dark burgundy color, which, as a result, very successfully fit into the general view along with gates of a similar color, dark window frames and the roof of the building.
To summarize this. Laying ceramic granite on a wall is a difficult task, but many of you who periodically pick up a building tool and are not lazy to work it yourself will be able to do it. Well, we can only wish such people success, and recommend watching a video in this article containing a lot of interesting information.